
Introduction
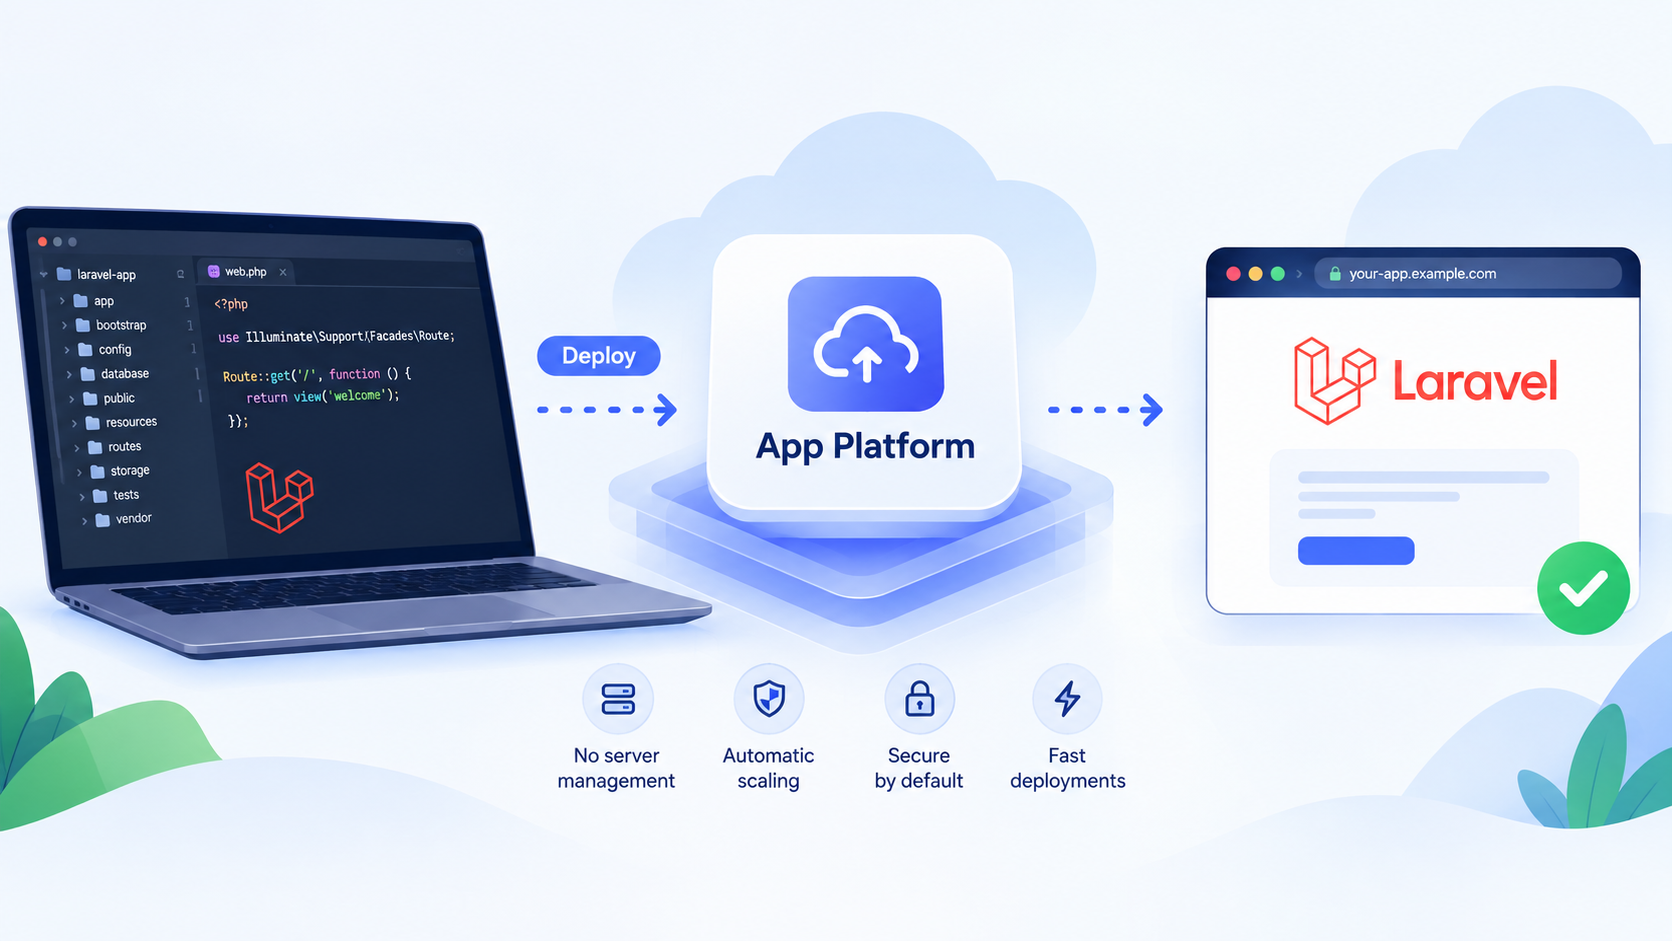
Kubana App Platform builds and hosts applications from a GitHub repository so you do not have to provision or maintain a server yourself. You connect the repo with a read-only deploy key, choose a size, pick Laravel and PHP versions, select a branch, then deploy from the dashboard. You do not add a Dockerfile: Kubana builds the image for you, including your frontend assets. After the first deploy you get a public HTTPS URL, build history, and runtime logs. You can also turn on auto-deploy so a push to your branch starts a new build, attach custom domains with TLS, and run artisan commands after each successful deploy.
This guide walks you through creating a Laravel HTTP app on App Platform, verifying GitHub access, setting versions and the git branch, deploying, and managing the app after it is live.
Note: Laravel on App Platform is a backend runtime, not a static frontend. Kubana builds the container from its own Dockerfile and runs PHP with FrankenPHP. Your repository only has to be a normal Laravel app.
Prerequisites
- A Kubana Cloud account with App Platform access and enough credits for the size you choose
- A project in the dashboard (create one under Projects if you do not have one yet)
- A GitHub repository that contains your Laravel app (public or private)
- A Laravel 10 or later (
laravel/frameworkmajor 10+) and PHP 8.3 or later. Laravel 9 and below, and PHP 8.2 and below, are not supported.
If you do not have a repository yet, create a Laravel app locally, then push it to GitHub:
composer create-project laravel/laravel my-laravel-app
cd my-laravel-app
php artisan key:generate
The current Laravel installer creates a supported major. If you already have an app, upgrade it to Laravel 10+ and PHP 8.3+ before you deploy.
Before you deploy
- Bring your own database. App Platform does not create a database for you. Point your
DB_* environment variables at a database that already exists. - Do not use a local SQLite database. App Platform runs your app in Docker containers, which are temporary. Anything written to the container's filesystem, including a
database.sqlitefile, is lost when the app redeploys or restarts. Use MySQL, PostgreSQL, or another database that runs outside the app platform. - Migrations only run if you add them. Kubana never runs
php artisan migrateon its own. Addphp artisan migrate --forceas a post-deployment command (see Step 6). - Keep the
/uphealth route (Laravel 11+). Kubana checks thatGET /upresponds before it switches traffic to a new version, so a deploy fails if the route was removed.
What Kubana builds for you
- PHP extensions:
pcntl,pdo_mysql,pdo_pgsql,redis,intl,zip,gd,bcmath,opcache. Apps that need other extensions (for exampleimagick) are not supported yet. - Frontend assets: when
package.jsonexists, Kubana runsnpm run buildusing pnpm, yarn, or npm depending on your lockfile. Livewire, Flux, and Ziggy imports fromvendor/work. - Not supported: apps in a repository subfolder, and Composer
pathrepositories (local packages inside the repo).
Step 1: Creating the App on App Platform
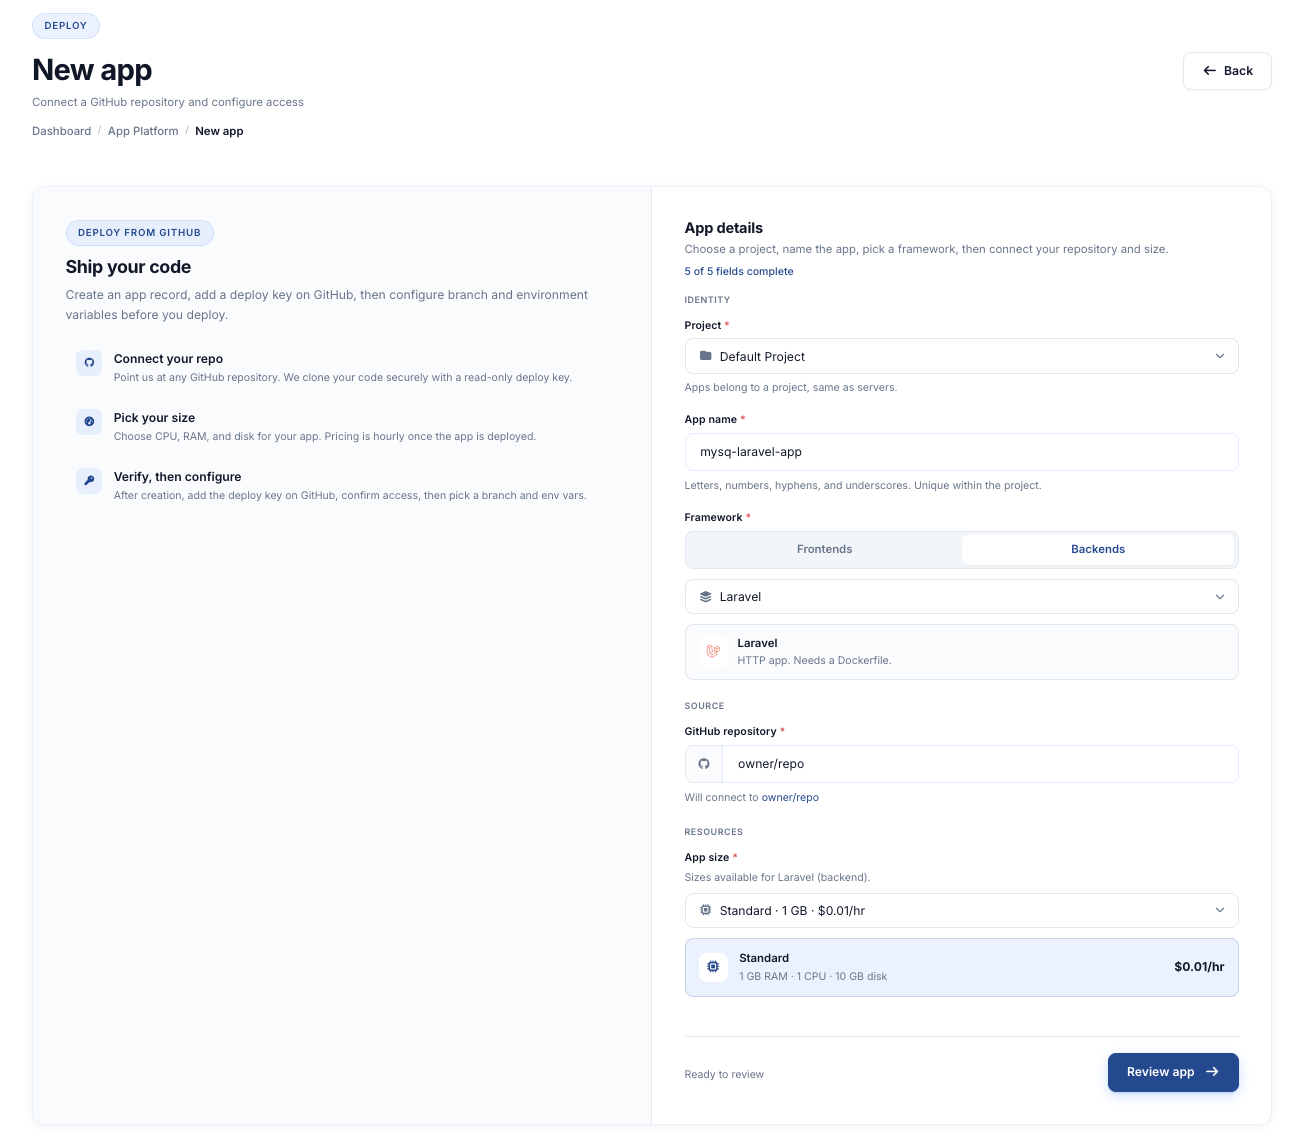
In the Kubana dashboard, open App Platform and choose Create app.
Fill in the form:
- Project: The project this app belongs to.
- Name: A label you will recognize later, for example
my-laravel-app. - Framework: Choose Backend, then Laravel. The picker describes this as an HTTP app that Kubana builds, with no Dockerfile needed.
- GitHub repository: Paste the repo as
owner/repo,https://github.com/owner/repo, orgit@github.com:owner/repo.git. - Size: CPU, RAM, and disk. Pricing is hourly after the app is deployed.
Review the summary, confirm, and create the app. Kubana stores the app record and generates a public SSH deploy key. It does not clone or build until you add that key and finish configuration.
Step 2: Adding the Deploy Key on GitHub
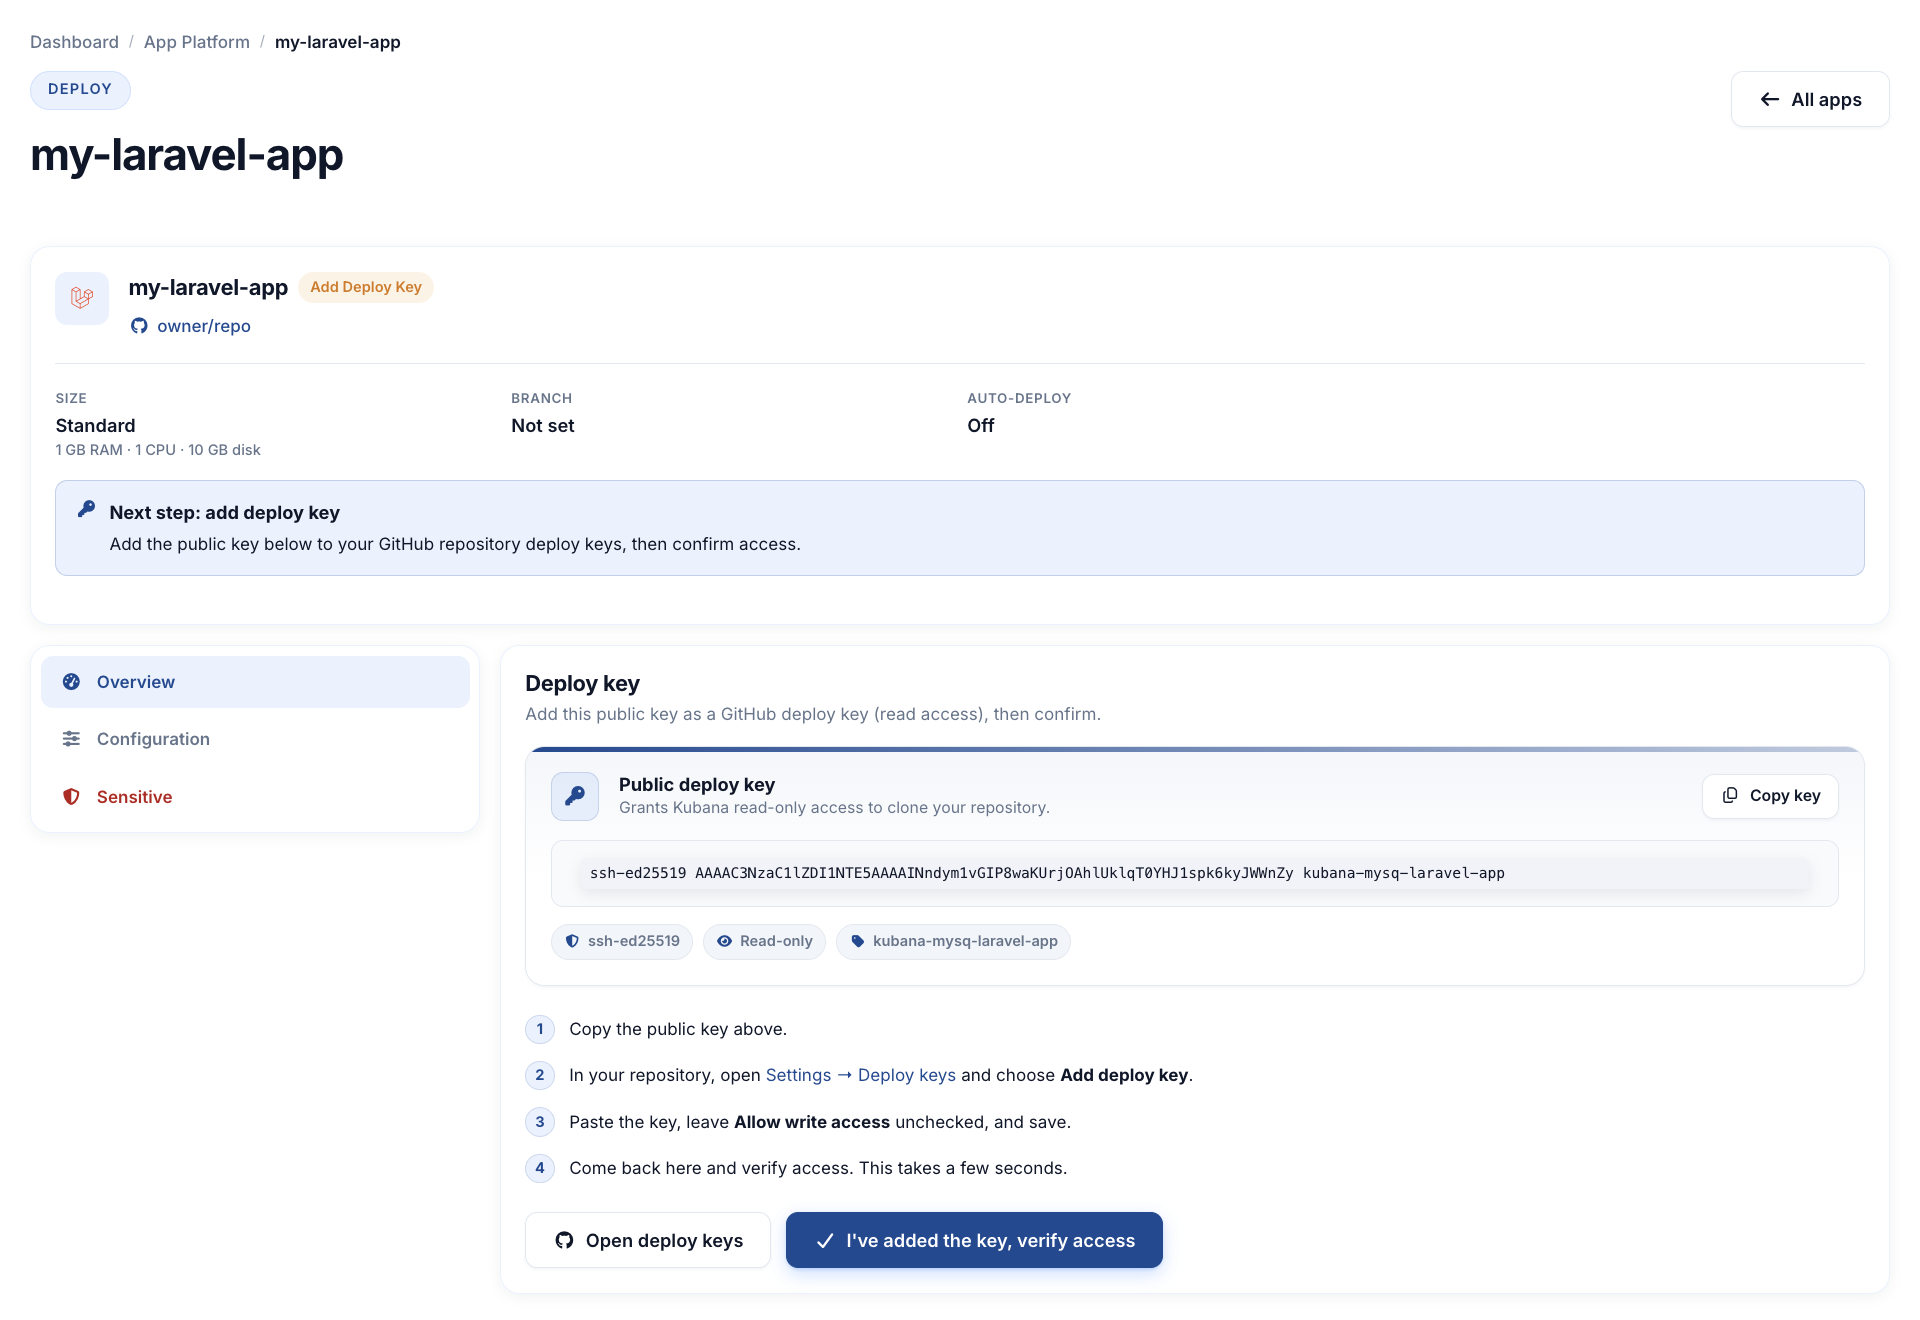
The new app opens on the Deploy key panel. The key grants Kubana read-only access so it can clone the repository. Leave write access off.
- Copy the public deploy key from the dashboard.
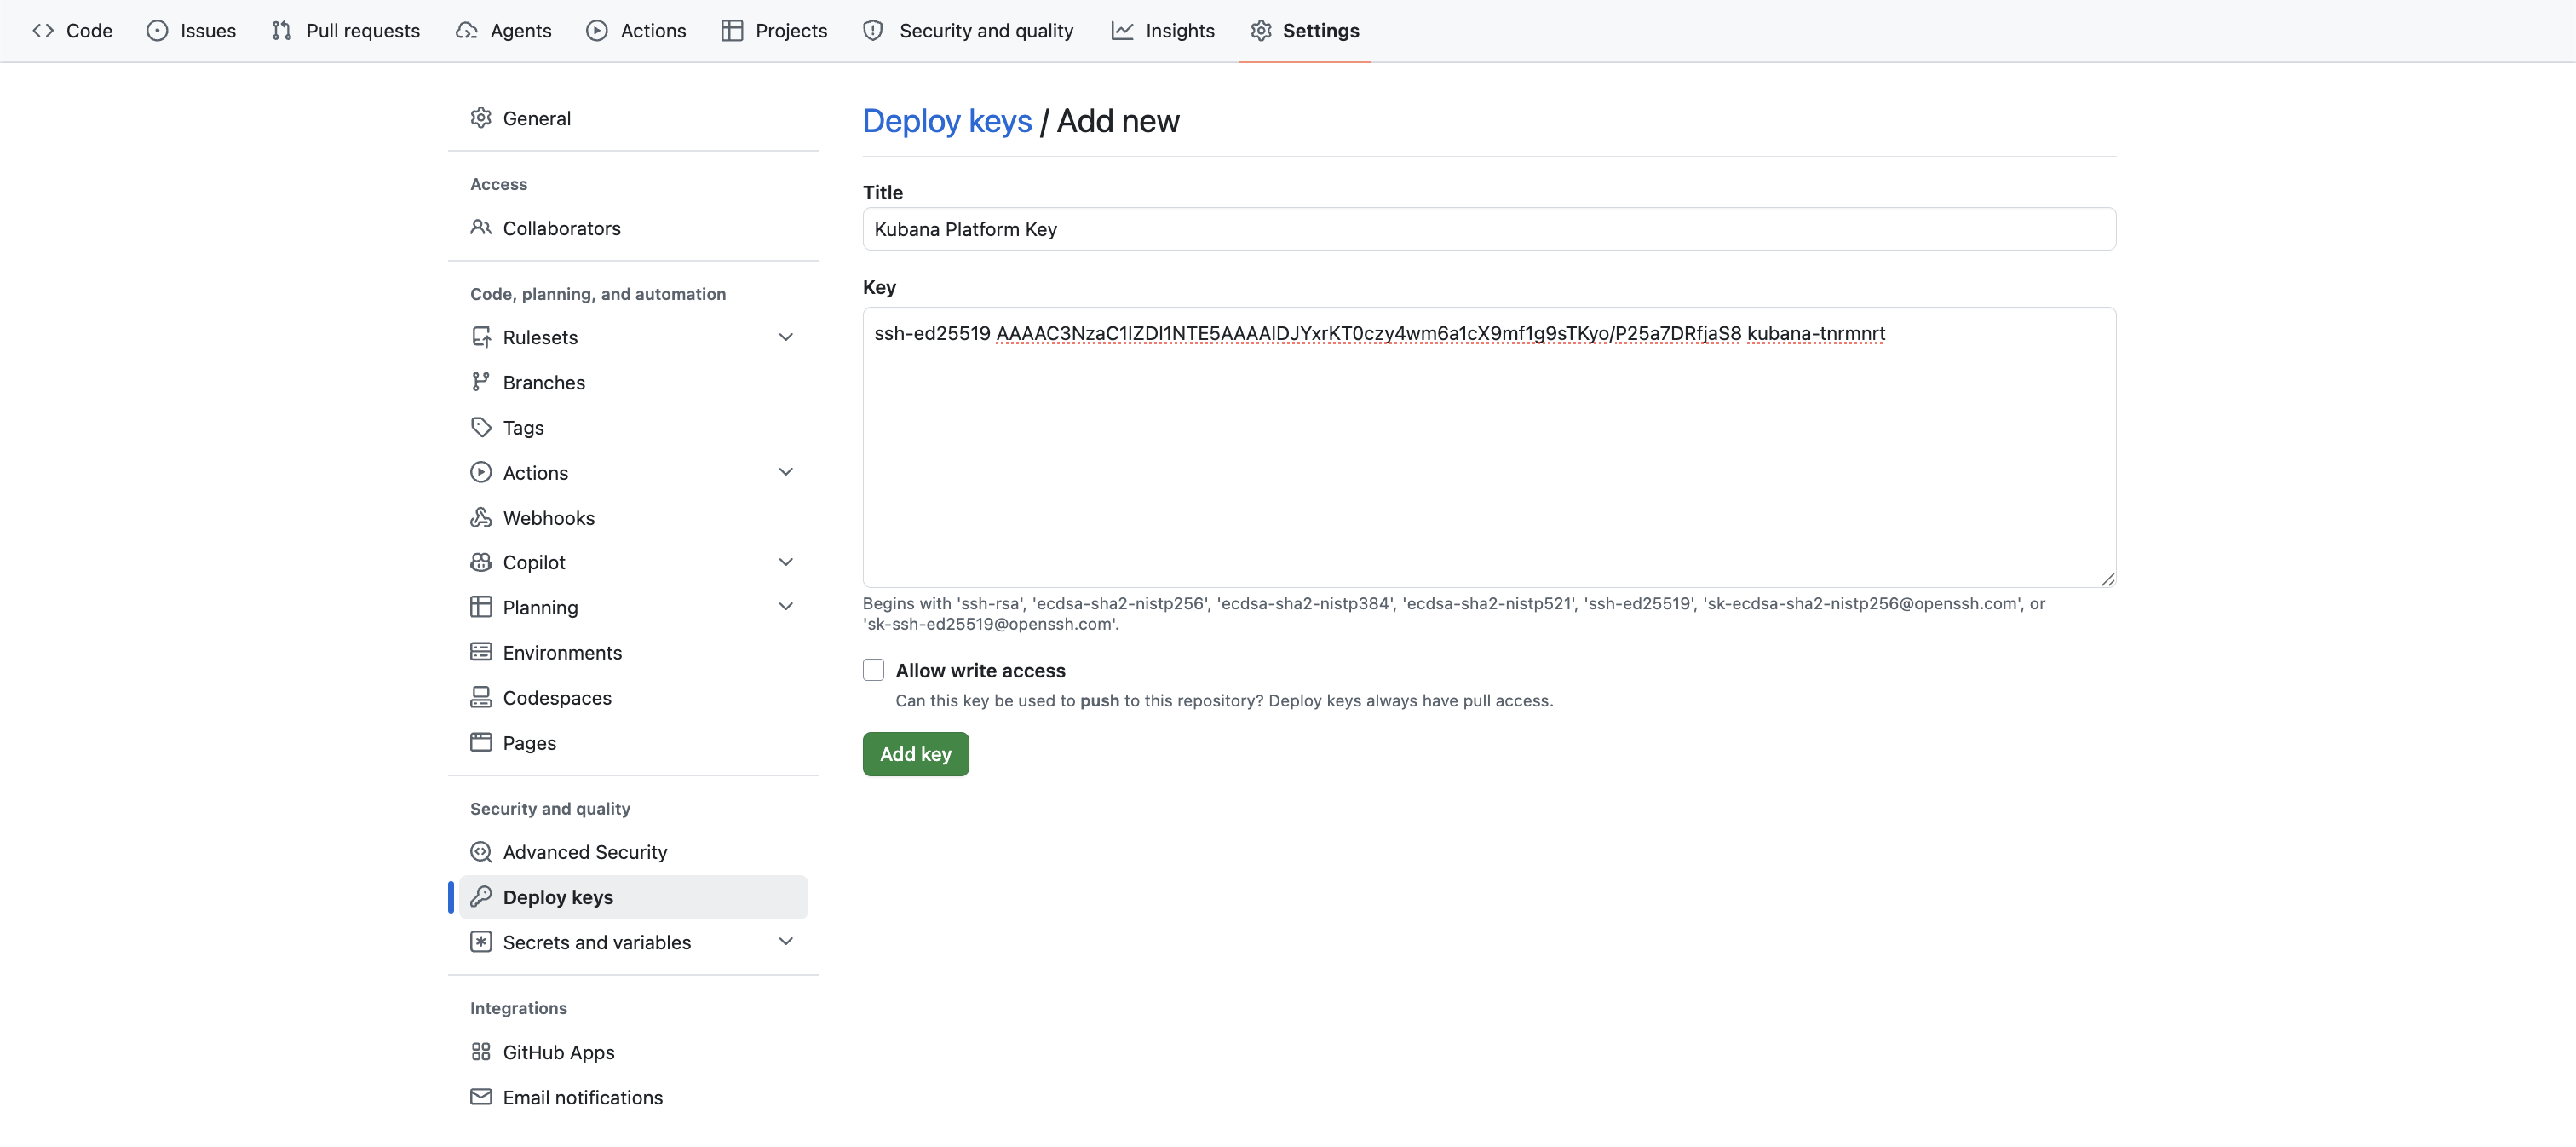
- In GitHub, open the repository → Settings → Deploy keys → Add deploy key. From the Kubana deploy key panel you can click Open deploy keys to jump straight to that page.
- Paste the key, give it a title such as
Kubana App Platform, and leave Allow write access unchecked. - Save, then return to Kubana and choose I've added the key, verify access.
Verification takes a few seconds. When it succeeds, the app status moves to Ready, and Laravel/PHP versions, branch, environment variables, post-deployment commands, and domains unlock.
If verification fails, confirm the key is on the same repository you entered at creation, that it was saved, and that write access is not required (read-only is enough).
Step 3: Choosing Laravel and PHP Versions
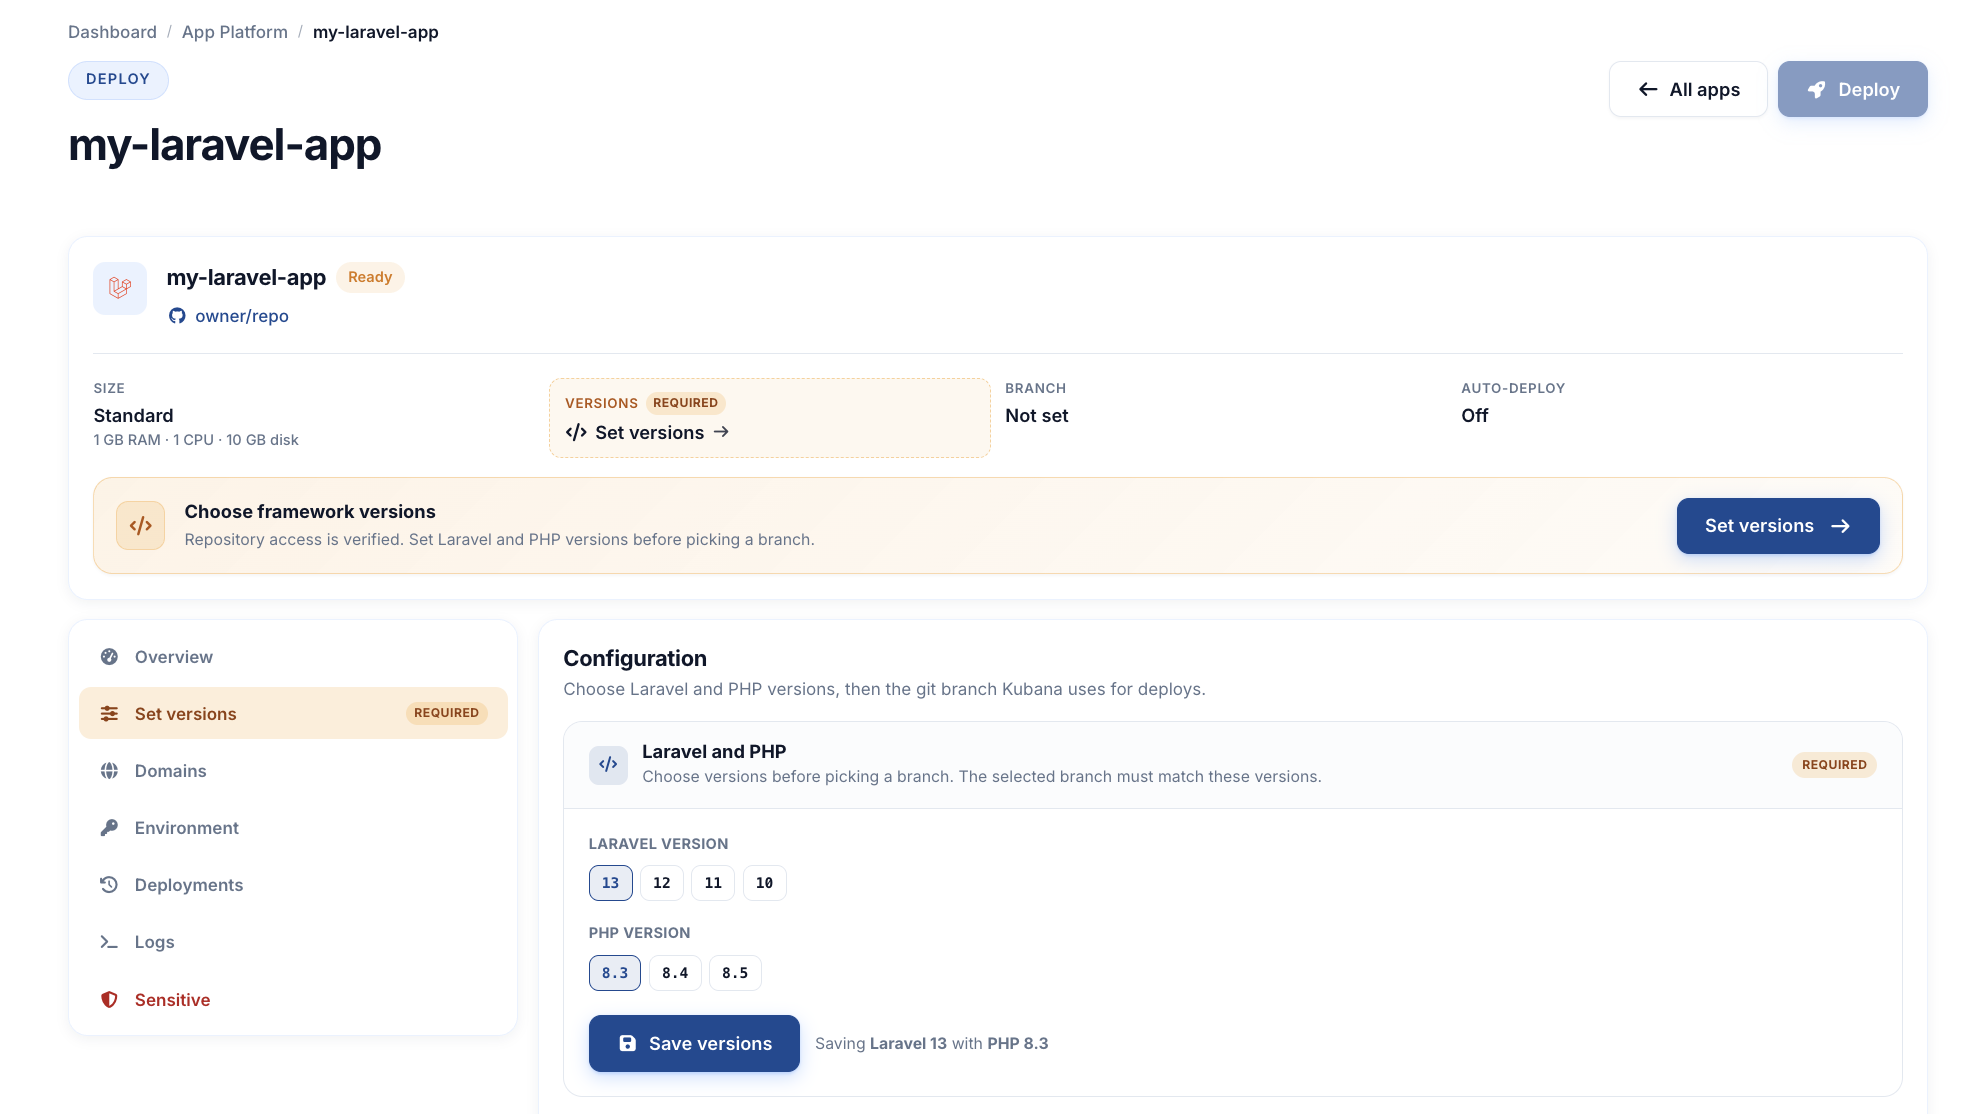
Open the Configuration tab. Laravel apps must save a framework version pair before you can pick a branch. App Platform supports Laravel 10+ and PHP 8.3+ only.
- Choose the Laravel major (
10or later, for example12). - Choose the PHP version (
8.3or later, for example8.4). - Save.
The selected branch must match the Laravel major. You cannot pick a branch until this pair is saved.
If you change the versions on an app that is already deployed, save again, then Redeploy. Kubana rebuilds the app from scratch on that deploy, so the app is briefly unavailable while it runs.
Step 4: Choosing the Git Branch
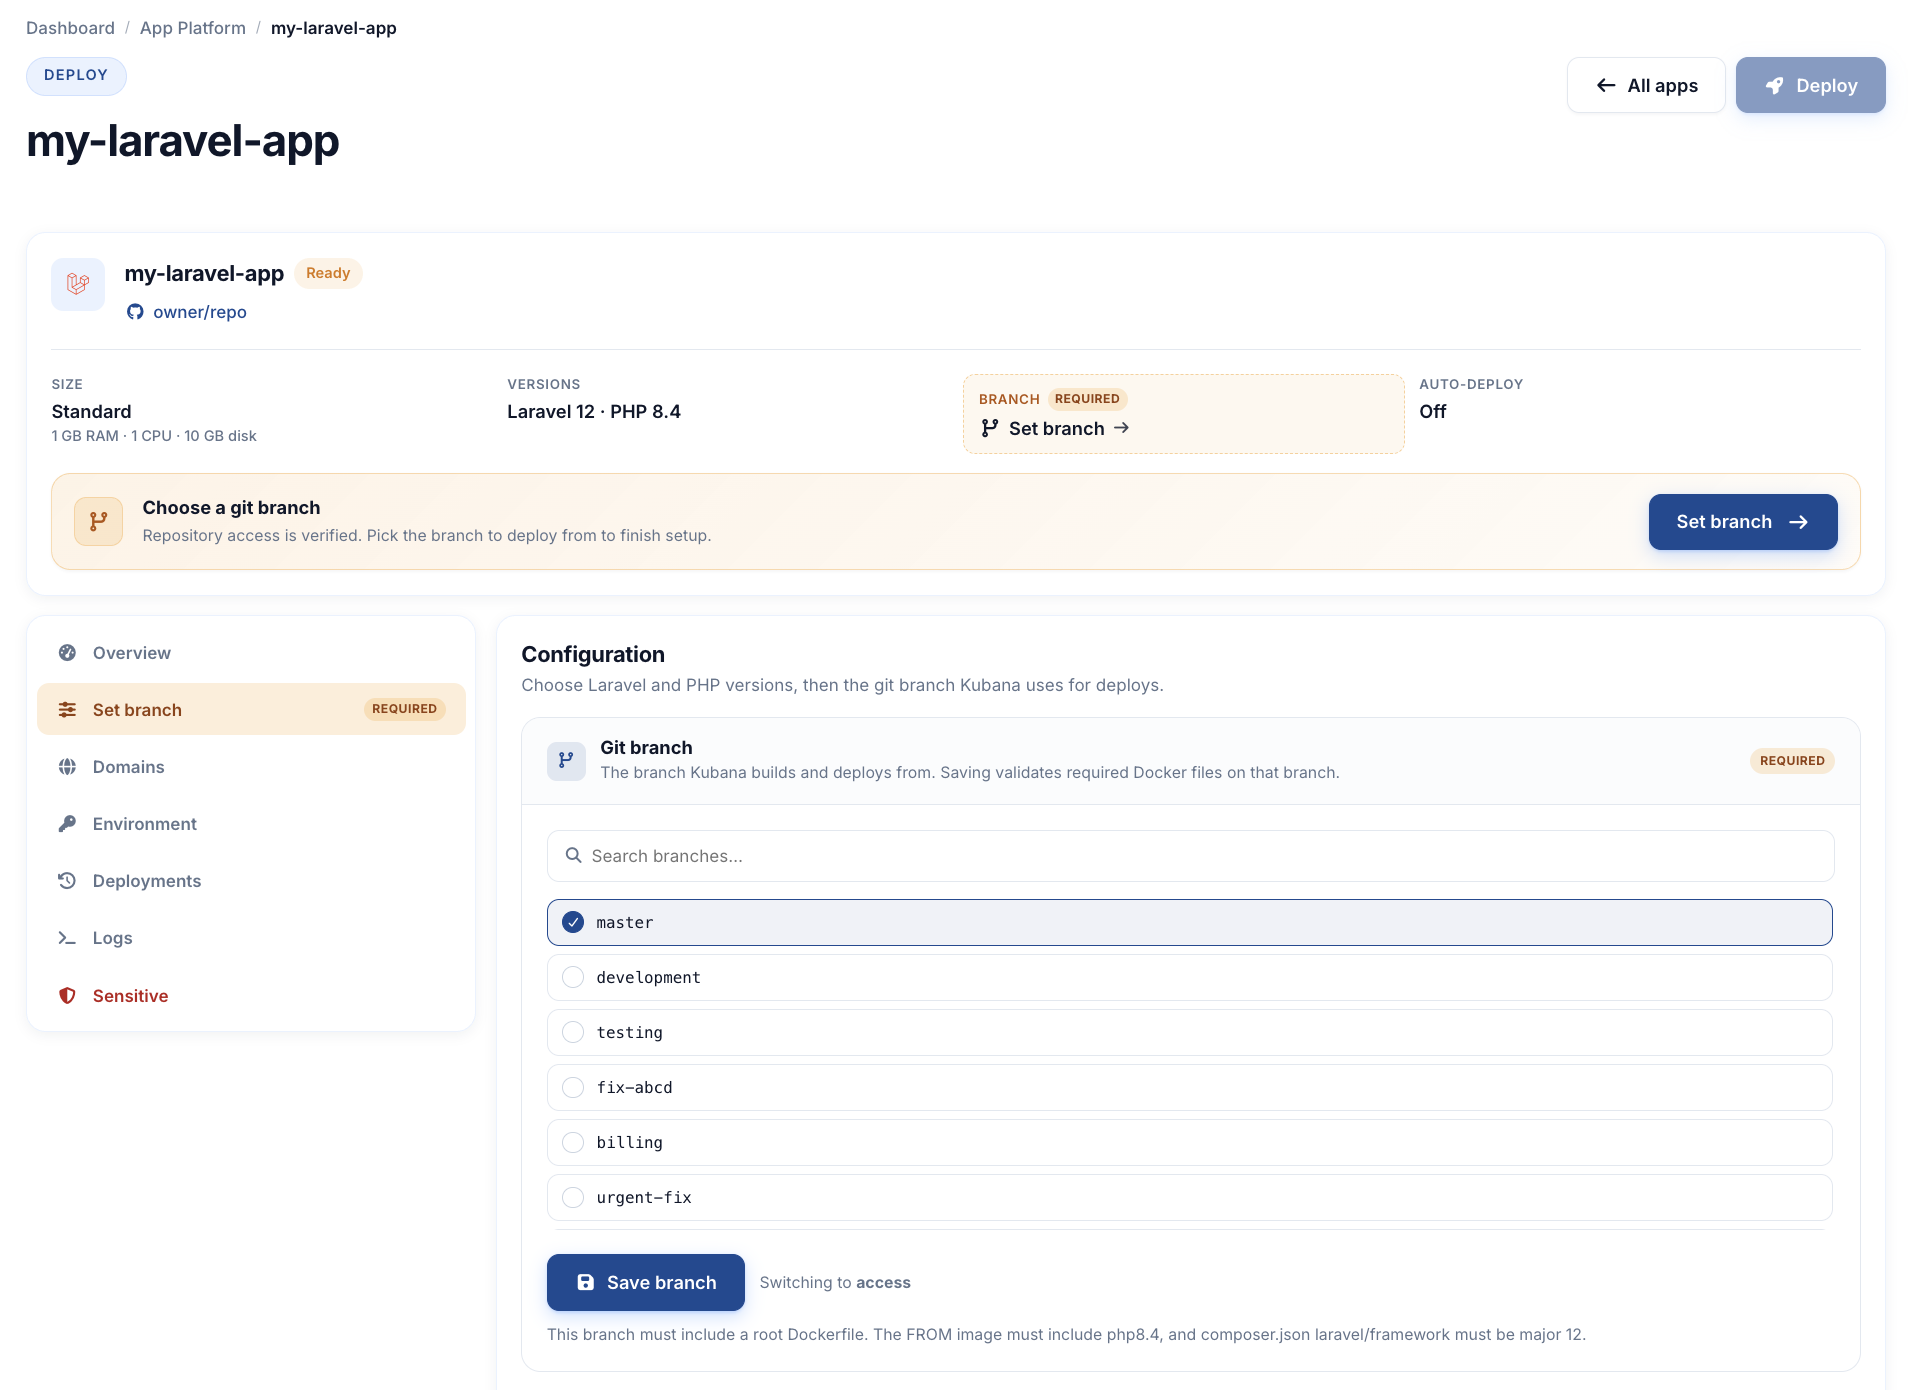
Still on Configuration, load branches from GitHub, select the branch Kubana should build (usually main or master), and save.
Saving the branch checks that it is a Laravel app (artisan at the root) and that composer.json requires a laravel/framework major that matches the version you saved. If the check fails, the dashboard shows why, for example a version mismatch. Change the Laravel version in the app settings or fix composer.json, then save again.
Kubana deploys only this branch. Feature branches are ignored unless you switch the saved branch.
If you change the branch later, save it, then Redeploy so the running app matches the new branch. Saving the branch alone does not start a deploy.
Step 5: Adding Environment Variables
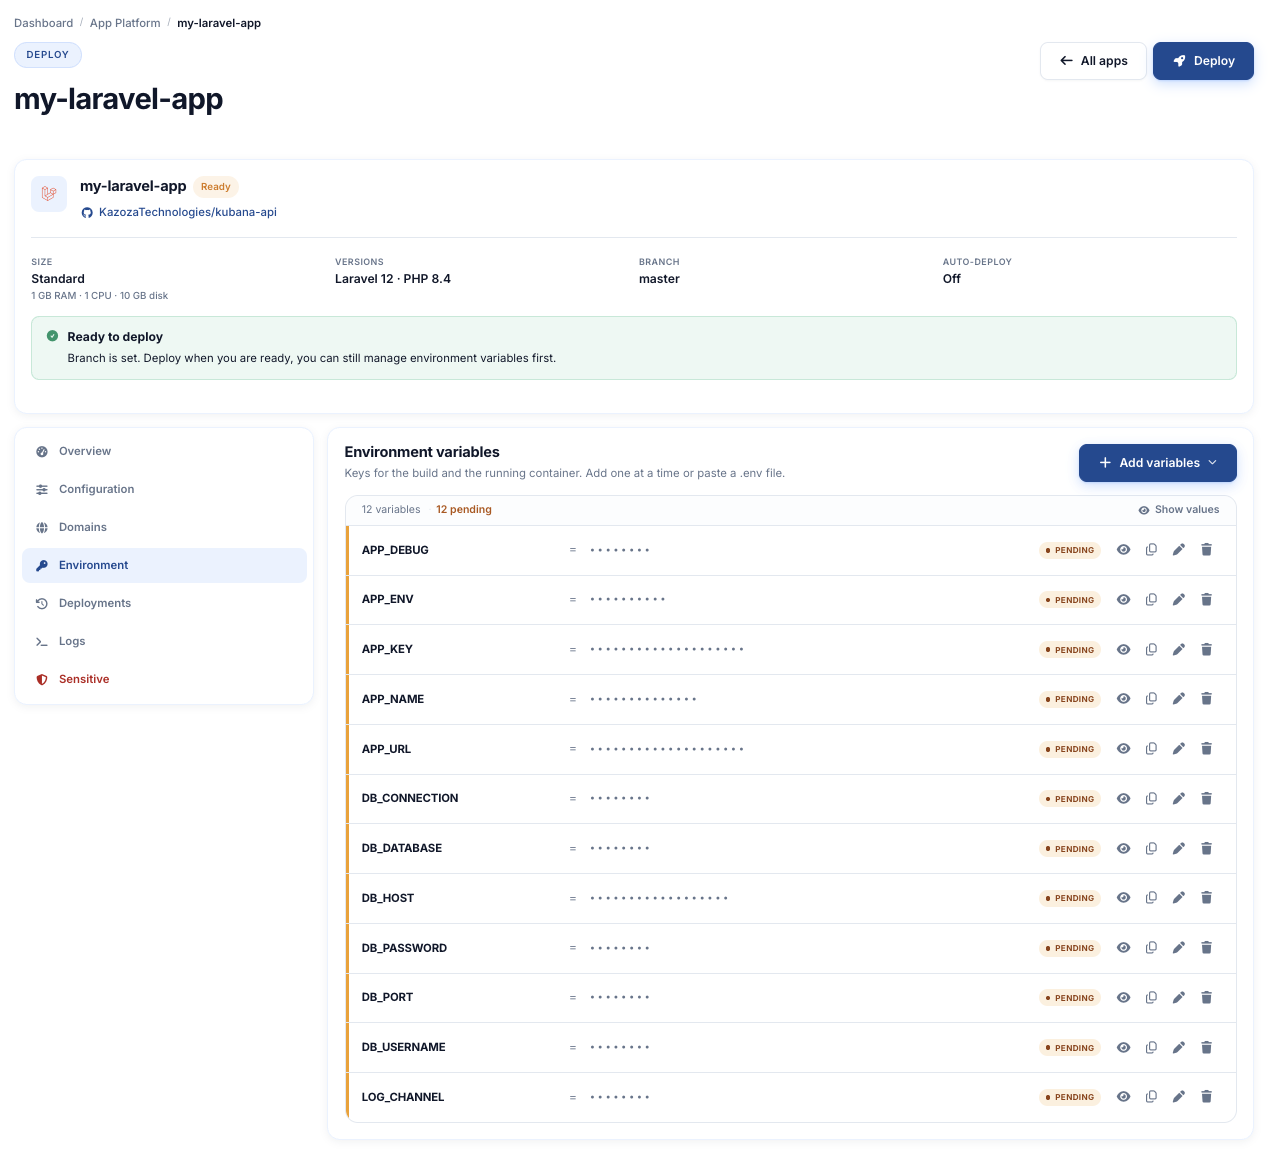
Open the Environment tab. You can add a single KEY=value or paste a .env file. Keys are stored in Kubana and sync to the running app on the next deploy. New or edited keys show as Pending until that deploy succeeds.
For Laravel apps, variables are available at runtime, not while the image builds. Most apps are unaffected. The exception is frontend variables that Vite reads at build time (VITE_*, for example VITE_PUSHER_APP_KEY or VITE_REVERB_*): they are empty in the built JavaScript for now.
Keys named GIT_SSH_KEY_B64 or starting with KUBANA_ are reserved by Kubana and cannot be used.
A Laravel oriented environment variables set:
APP_NAME=My Laravel App
APP_ENV=production
APP_DEBUG=false
APP_KEY=base64:your-generated-key
APP_URL=https://your-app.platform.kubana.app

LOG_CHANNEL=stderr

DB_CONNECTION=mysql
DB_HOST=your-database-host
DB_PORT=3306
DB_DATABASE=laravel
DB_USERNAME=laravel
DB_PASSWORD=secret
Generate APP_KEY locally with php artisan key:generate --show and paste the value. Set APP_URL to the Kubana public URL after the first deploy, or to your custom domain once it is attached.
Point DB_* at a database the container can reach (a Kubana MySQL cluster, another managed database, or a host you already run). App Platform does not create a database when you create the Laravel app.
Avoid DB_CONNECTION=sqlite with a file inside the app. The container's filesystem is temporary, so the SQLite file and all its data are lost on the next deploy or restart.
After you add, change, or delete variables, deploy again so the running app sees the change.
Step 6: Post-Deployment Commands (Optional)
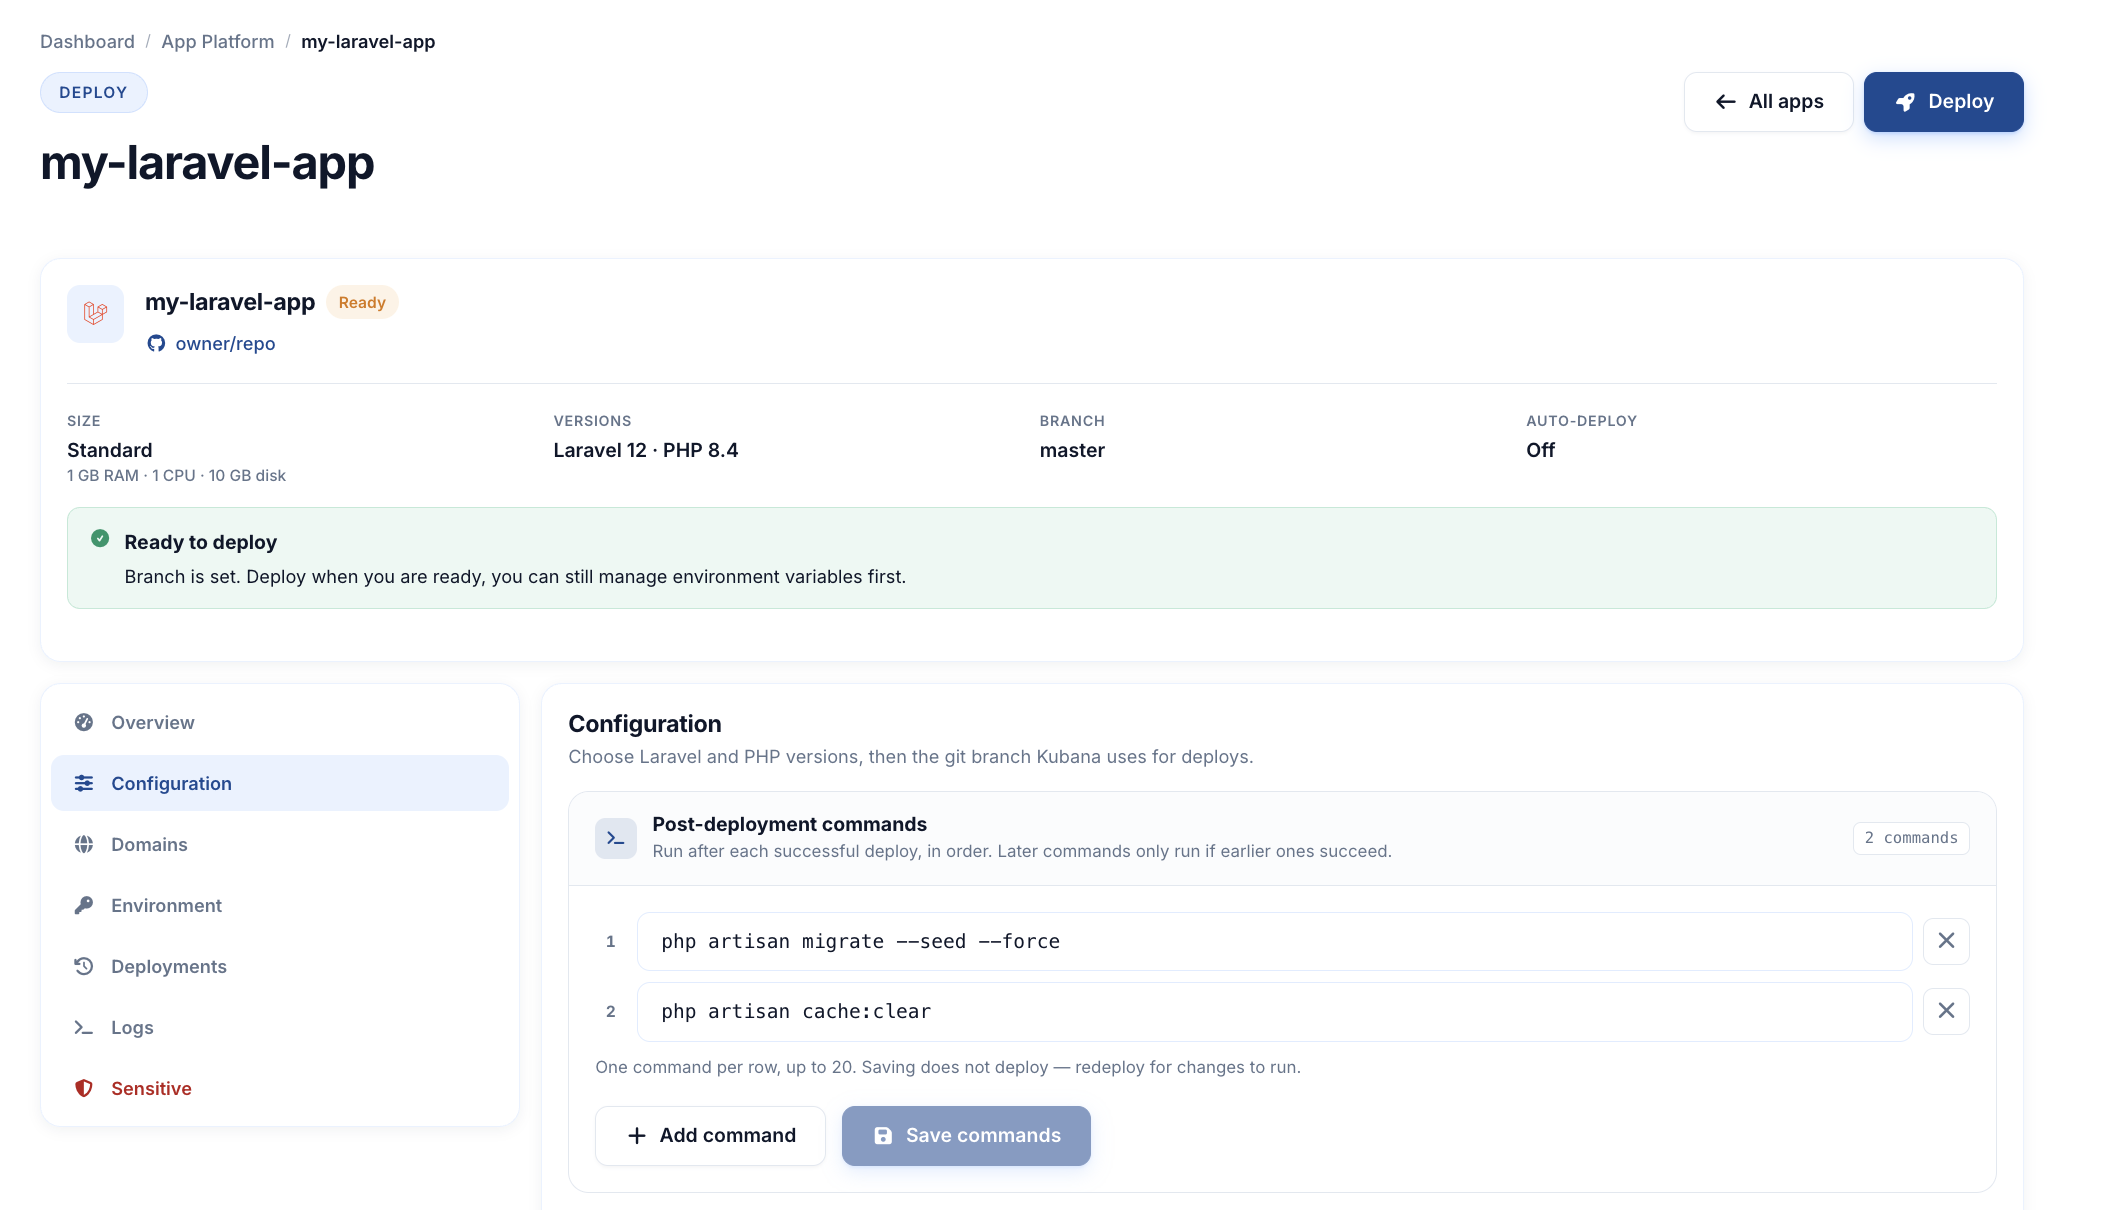
On Configuration, Post-deployment commands run in the container after each successful deploy, in order. Later commands run only if earlier ones succeed.
Kubana never runs migrations on its own. Add them here, together with any caches, for example:
php artisan migrate --force
php artisan config:cache
php artisan route:cache
php artisan view:cache
On a Laravel web app with no commands yet, the dashboard suggests php artisan migrate --force; click it to add it. Saving the list does not run the commands until the next successful deploy. You can add or edit them before the first deploy.
Step 7: Deploying the App
When the deploy key is confirmed, Laravel and PHP versions are saved, and a branch is set, Deploy becomes available.
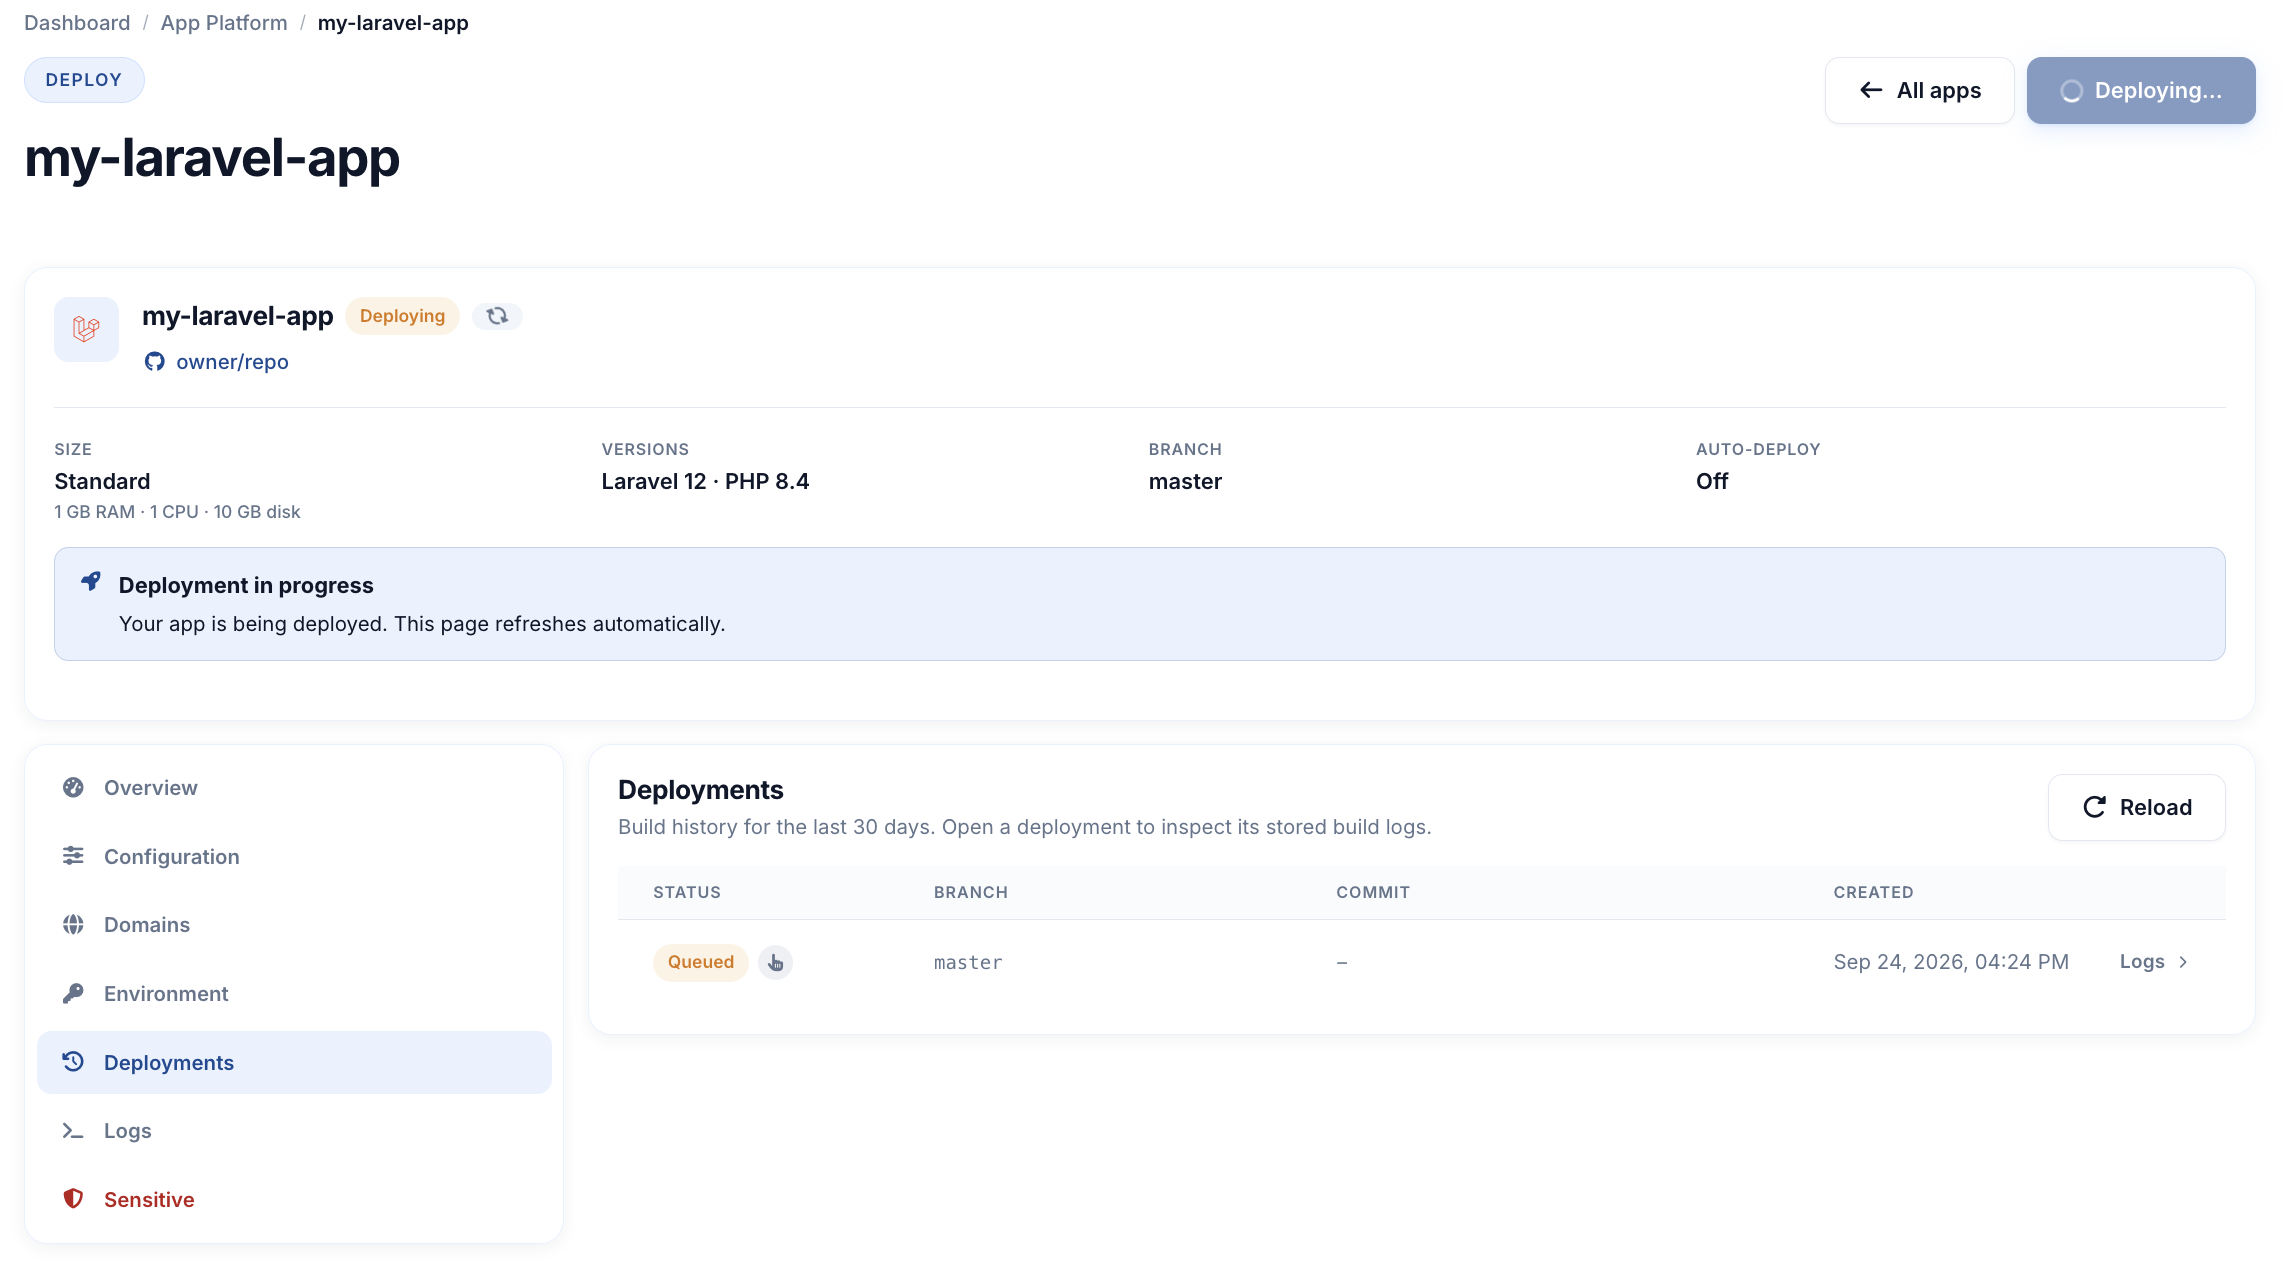
Choose Deploy and confirm. Status moves through Deploying while Kubana clones the branch, builds the image (Composer dependencies and frontend assets), and starts the container. You can follow progress in Deployments (commit, branch, queued / in progress / succeeded / failed) and open build logs if a deploy fails.
When the app is Active, the overview shows a public URL and the live commit (the short SHA of the code that is running, linked to GitHub). Open it over HTTPS to confirm Laravel responds. Update APP_URL to that hostname if you have not already, then redeploy.
Note: On a new app, SSL can take a few minutes to finish issuing, both for the generated
*.platform.kubana.apphostname and for any custom domain you attach. If the browser warns that the certificate is not ready, wait and try again.
If the deploy fails:
- Confirm
artisanandcomposer.jsonare at the repository root. - Confirm
composer.jsonlaravel/frameworkmatches the saved Laravel major (10 or later). - For Laravel 11+, confirm the
/uphealth route still responds. - Confirm your app does not need a PHP extension outside the list above.
- Confirm
composer installworks on that branch. - Check that
APP_KEYand requiredDB_*variables are present. - Read the failed deployment's logs in the dashboard.
If the app shows The repository could not be reached, the deploy key was removed from GitHub or the branch was deleted. The app page shows the deploy key again with a link to the repository's deploy key settings. Add it back (or restore the branch), then deploy again.
Note: If your Laravel app was deployed before Kubana started building Laravel images itself, the first deploy after the switch replaces the app's infrastructure. Expect a longer build and a short downtime. The URL and custom domains stay the same, and later deploys behave normally.
A failed or stopped app can be deployed again with Redeploy.
Rolling back to a previous version
Each row in Deployments that has a recorded commit has a Redeploy action. It starts a new deployment that builds the same commit as that row, so you can roll back without pushing an old commit again. Confirm the dialog; the new deployment appears at the top of the list.
Changing the branch, versions, environment variables, or post-deployment commands also requires a redeploy to apply.
Step 8: Enabling Auto-Deploy (Optional)
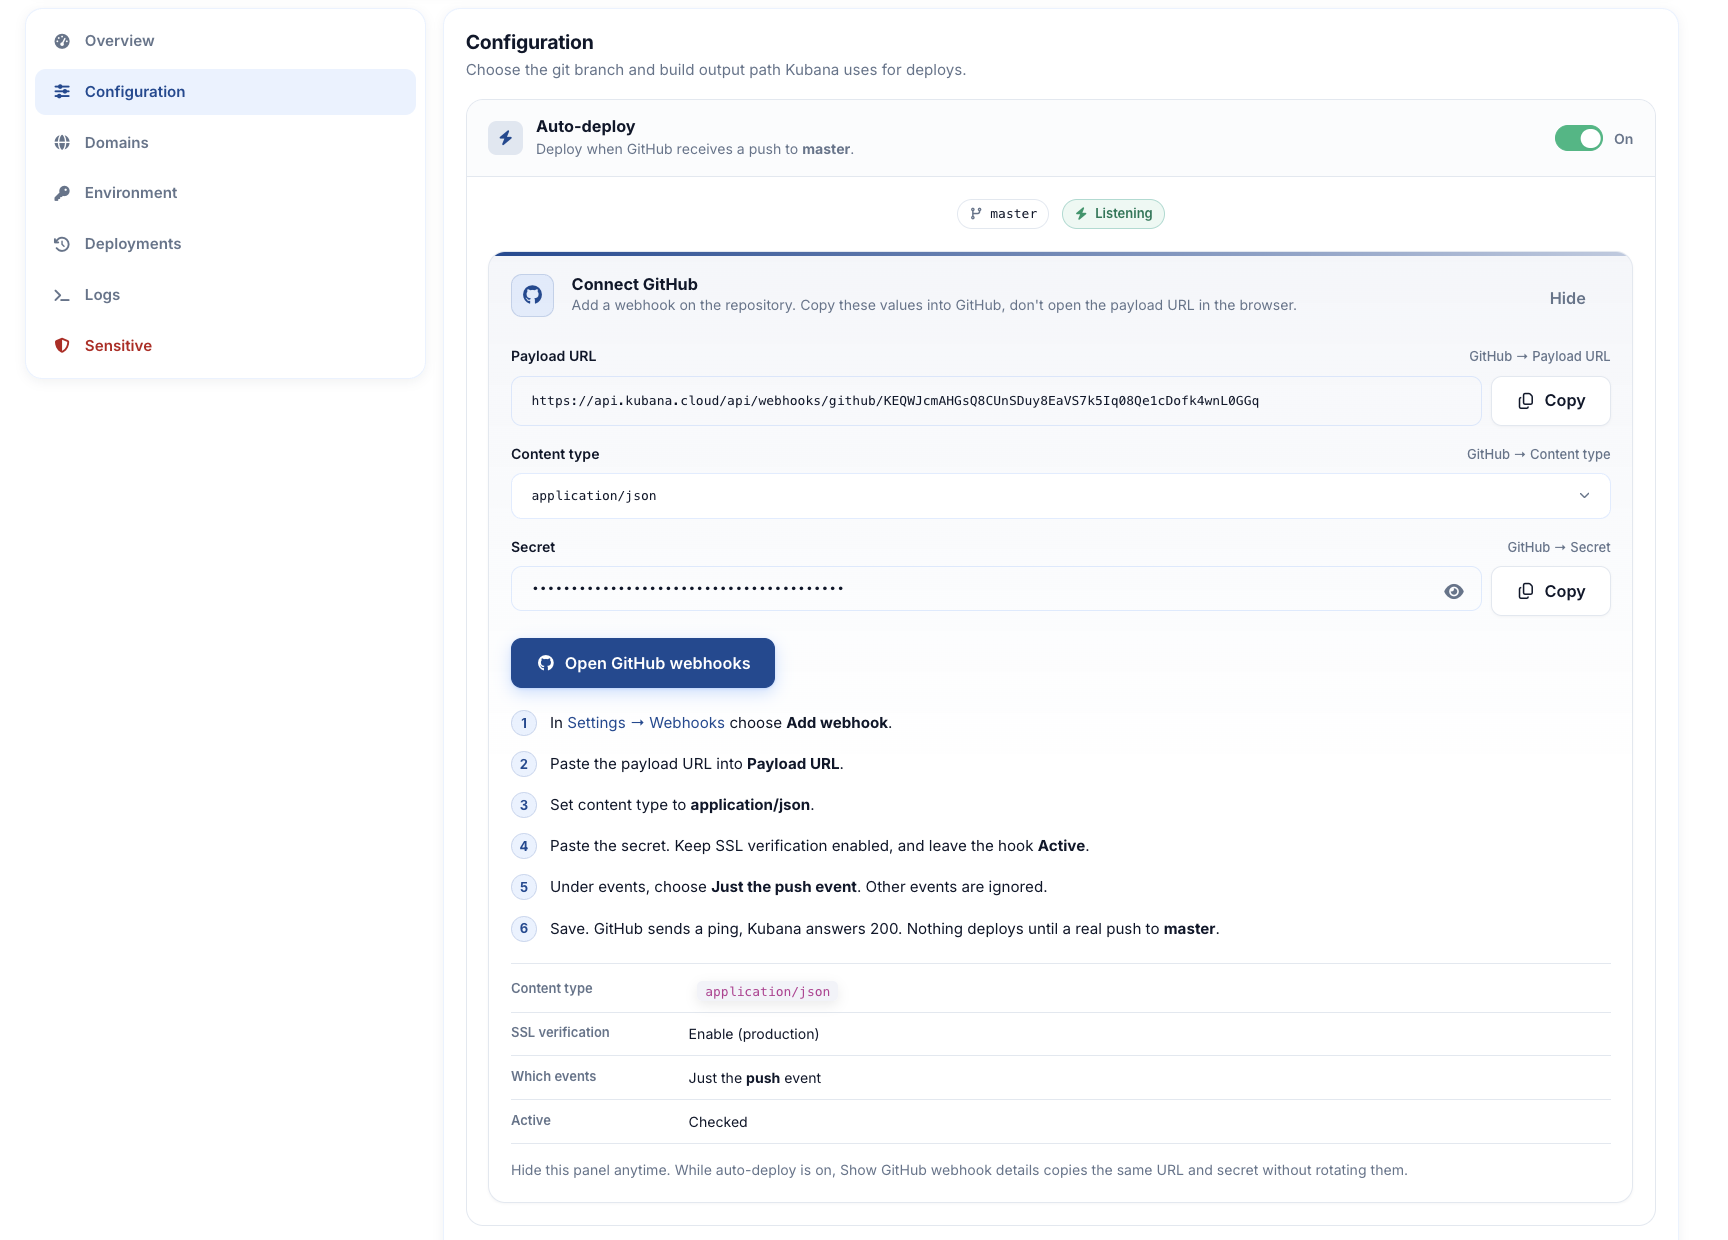
Auto-deploy rebuilds the app when GitHub receives a push to the saved branch. Enable it only after the deploy key, Laravel/PHP versions, and branch are set.
- On Configuration, turn Auto-deploy on and confirm.
- Choose Show GitHub webhook details and copy the Payload URL and Secret. Do not open the payload URL in a browser.
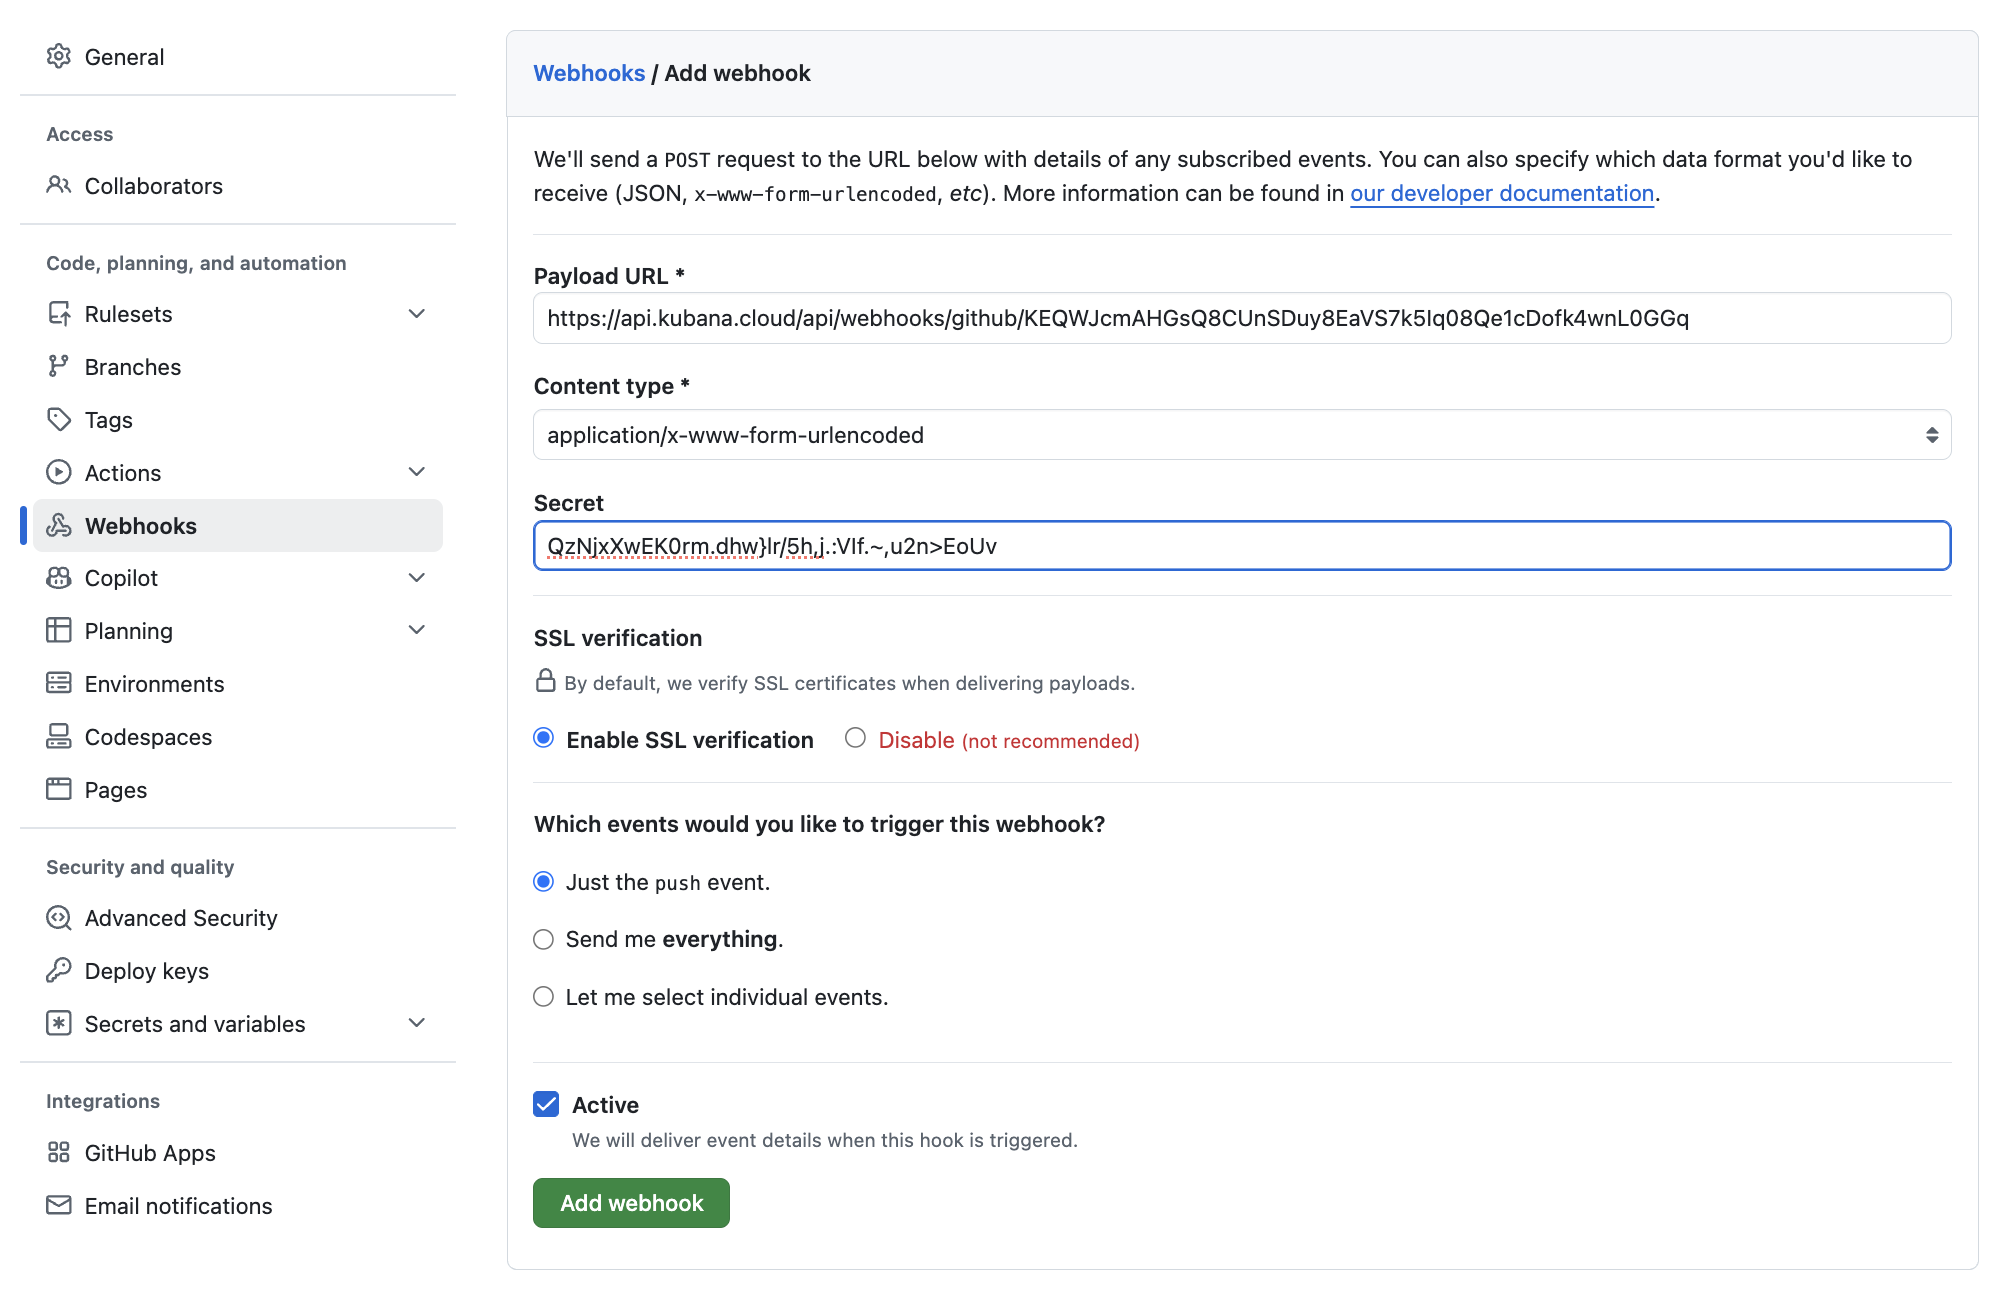
- In GitHub, open the repository → Settings → Webhooks → Add webhook.
- Paste the payload URL, set content type to
application/json, paste the secret, keep SSL verification on, and leave the hook Active. - Under events, choose Just the push event. Other events are ignored.
- Save. GitHub sends a ping; Kubana answers
200. Nothing deploys until a real push to the saved branch.
After that, git push to the configured branch starts a new deployment. The deployment list labels these as Auto deploy. You can turn auto-deploy off at any time; the webhook on GitHub can be removed if you no longer need it.
- Enable auto-deploy
- Add github webhook
Step 9: Attaching a Custom Domain (Optional)
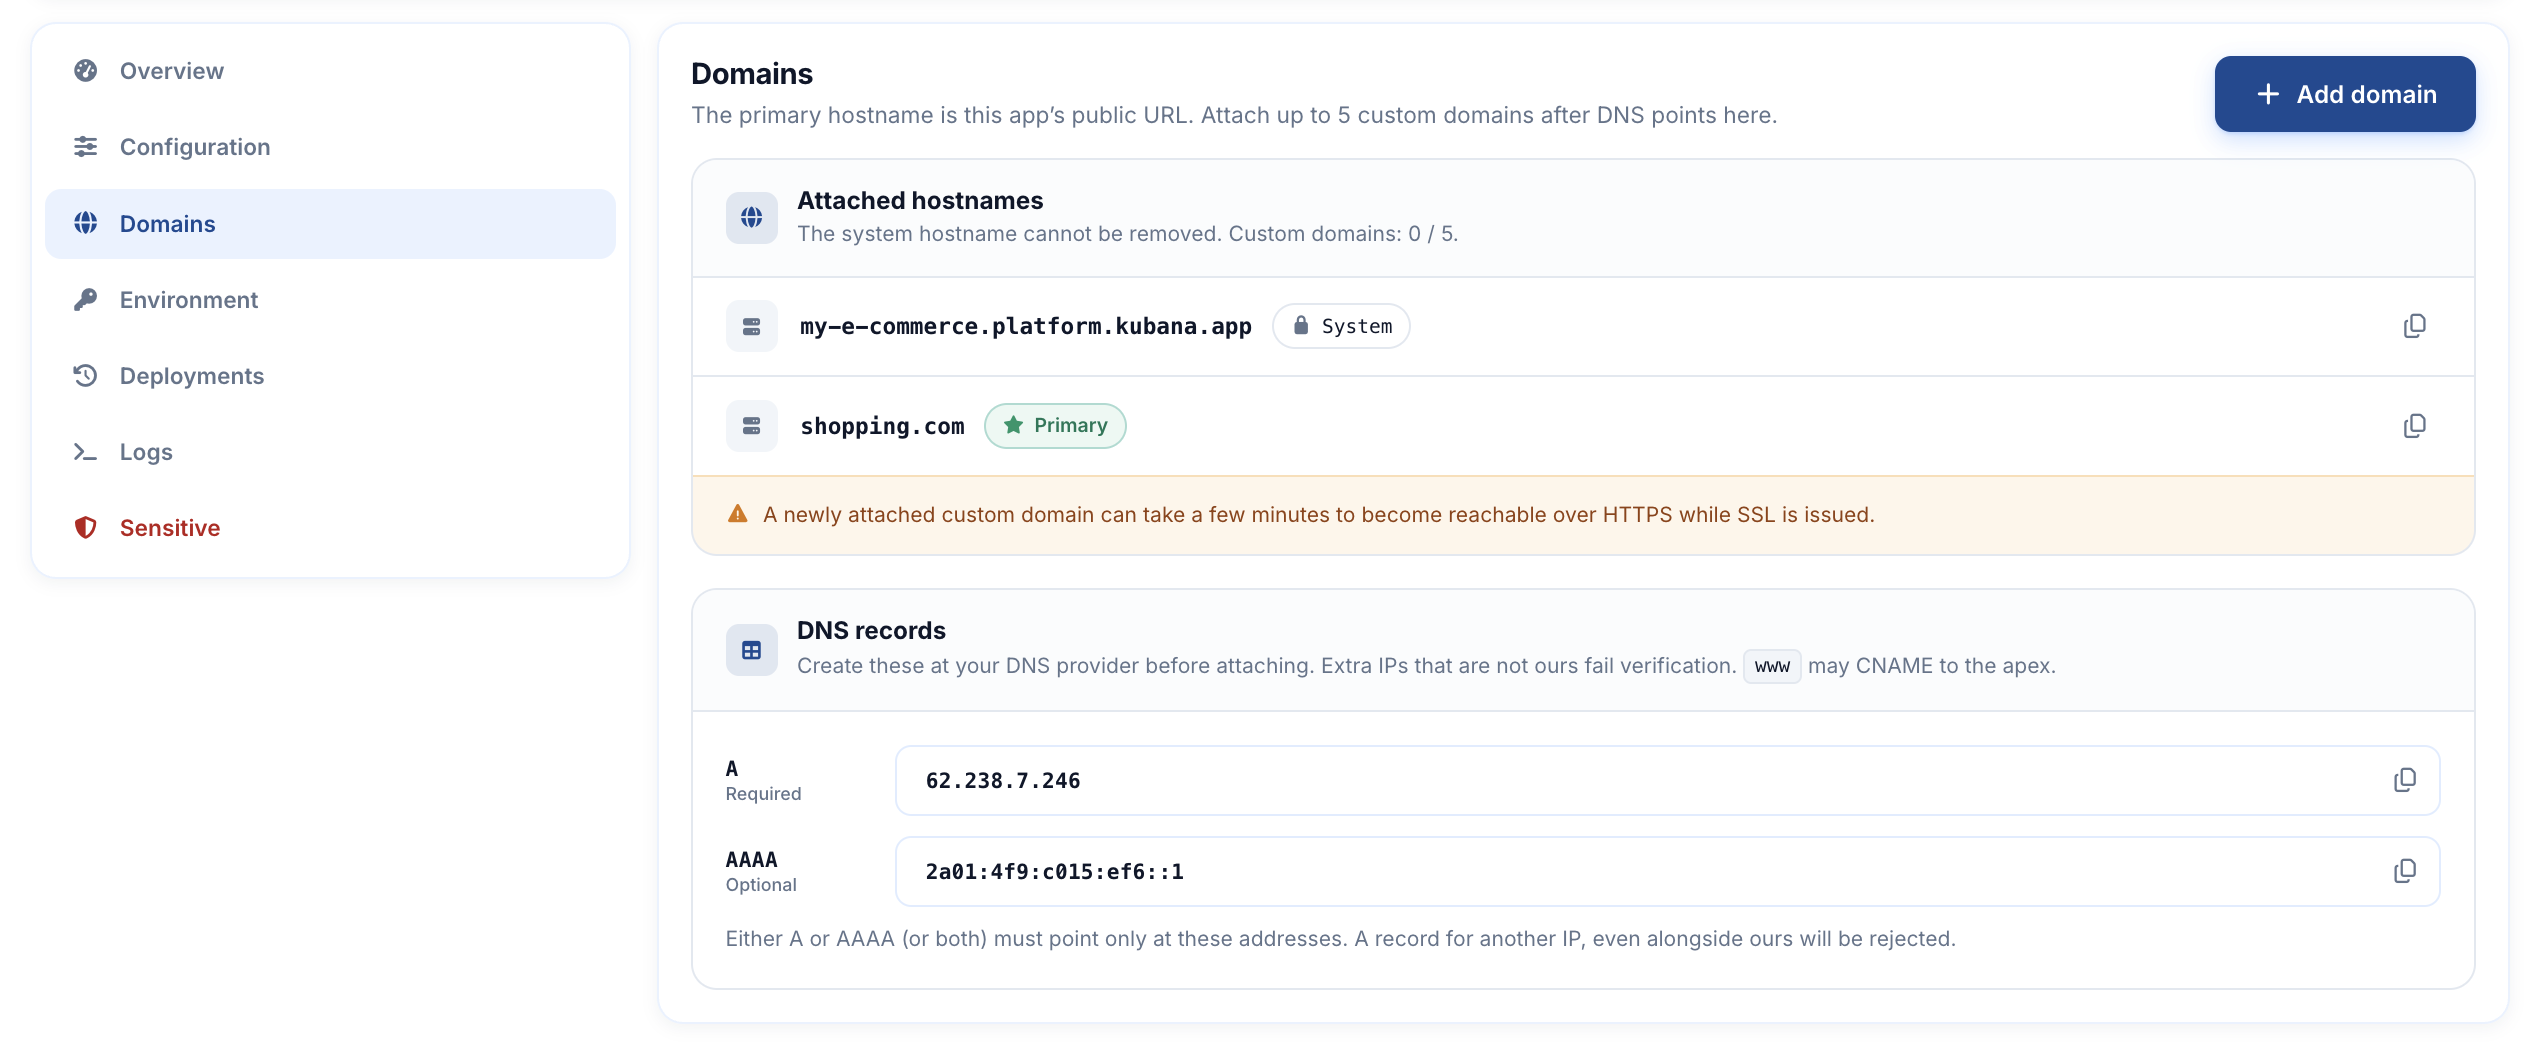
Every HTTP Laravel app gets a default Kubana hostname. You can attach up to five custom domains. TLS is issued for you after DNS verifies.
Create DNS records before you attach the hostname. Extra A/AAAA records that do not point at Kubana fail verification. www may CNAME to the apex.
| Type | Host | Value | Required |
|---|---|---|---|
| A | @ (or your subdomain) |
62.238.7.246 |
Yes |
| AAAA | @ (or your subdomain) |
2a01:4f9:c015:ef6::1 |
Optional (IPv6) |
Then, in the app Domains tab:
- Enter the hostname (for example
api.example.comorexample.com). - Attach the domain. Kubana verifies DNS.
- Optionally set it as primary so it is the main public URL.
A newly attached domain can take a few minutes to become reachable over HTTPS while the certificate is issued. After it is live, set APP_URL to https://your-domain and redeploy so generated links and cookies match the hostname.
If the domain lives on Kubana DNS, add the records in DNS Management. If it lives elsewhere, add them at that provider.
Step 10: Queue Workers and the Scheduler (Optional)
The Laravel framework is the HTTP app. Queues and schedule:work are a separate App Platform framework: Laravel Worker.
Create a second app on the same GitHub repository:
- Backend → Laravel Worker.
- Add the deploy key (each app has its own key).
- Save the same Laravel and PHP versions as the web app (Laravel 10+, PHP 8.3+).
- Select the same branch.
Scheduler log lines are prefixed with [sched] in Logs.
Run only one Laravel Worker per project. With two, scheduled tasks run more than once. Post-deployment commands are only available on the web app, so keep php artisan migrate --force there.
A Laravel Worker is a background service: it has no public URL and cannot use custom domains. Give it the same environment variables as the web app (especially APP_KEY and QUEUE_CONNECTION) so jobs share the same application and queue backend.
Step 11: Managing the App After Deploy
Use the app page for day-to-day operations:
- Overview: Status, repository, Laravel/PHP versions, branch, live commit, auto-deploy, public URL.
- Deployments: History, commit, trigger (manual or auto), build logs, and Redeploy to roll back to a previous commit.
- Logs: Output from the running container.
- Environment: Add, edit, or delete keys. The running app sees changes on the next deploy.
- Configuration: Switch versions, switch branch, edit post-deployment commands, toggle auto-deploy.
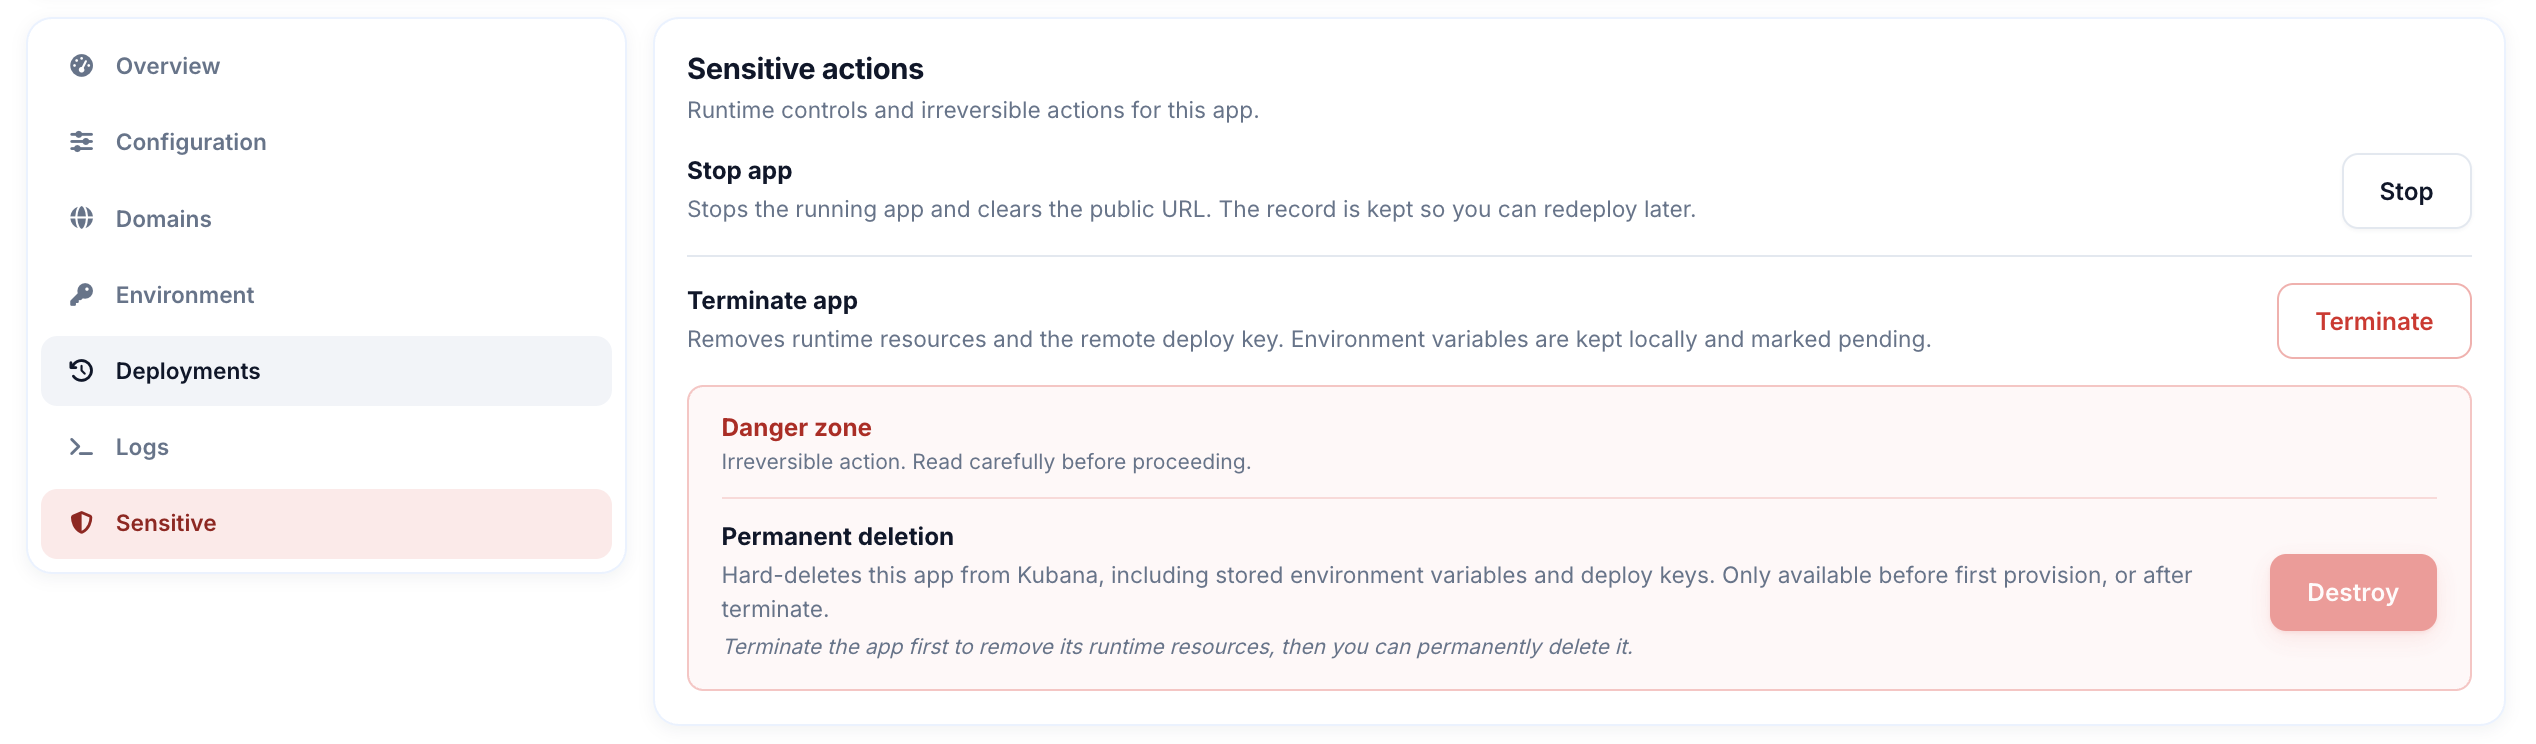
Sensitive actions:
| Action | What it does |
|---|---|
| Stop | Stops the running app and clears the public URL. The Kubana record stays so you can redeploy. |
| Redeploy | Builds again from the saved branch (from Active, Stopped, Error, or after terminate). From a deployment row, it rebuilds that deployment's commit. |
| Terminate | Removes runtime resources and the remote deploy key. Environment variables on the Kubana record are kept. |
| Delete | Permanently removes the app from Kubana, including stored environment variables. Available before the first provision, or after terminate. Type the app name to confirm. |
Hourly billing applies while the app is deployed and stopped. Terminate or delete when you no longer need the runtime to stop billing.
Conclusion
You now have a Laravel application on Kubana App Platform: the GitHub repo is connected with a read-only deploy key, Laravel and PHP versions are set, Kubana builds the app without any Dockerfile in your repo, and the app is reachable over HTTPS. From here you can add environment variables, run artisan commands after each deploy, turn on auto-deploy so every push rebuilds, roll back from the deployments list, point a custom domain at the app, and add a Laravel Worker for queues and the scheduler.
For more on App Platform, see the product overview in the dashboard, or contact support if anything goes wrong.