
Introduction
Kubana App Platform builds and hosts applications from a GitHub repository so you do not have to provision or maintain a server yourself. You connect the repo with a read-only deploy key, choose a size, set a branch and build output folder, then deploy from the dashboard. After the first deploy you get a public HTTPS URL, build history, and runtime logs. You can also turn on auto-deploy so a push to your branch starts a new build, and attach custom domains with TLS.
This guide walks you through creating a React app on App Platform, verifying GitHub access, configuring the branch and build directory, deploying, and managing the app after it is live.
Note: App Platform is in early access. If you do not see it in the dashboard yet, request access from the App Platform page. Public plan rates will be published when early access ends. Usage is billed hourly from your credits balance once the app is deployed.
Prerequisites
- A Kubana Cloud account with App Platform access and enough credits for the size you choose
- A project in the dashboard (create one under Projects if you do not have one yet)
- A GitHub repository that contains your React app (public or private)
- A React app that builds with npm, Yarn, or pnpm (Vite, Create React App, or a similar static frontend)
If you do not have a repository yet, create a Vite React app locally, then push it to GitHub:
npm create vite@latest my-react-app -- --template react
cd my-react-app
npm install
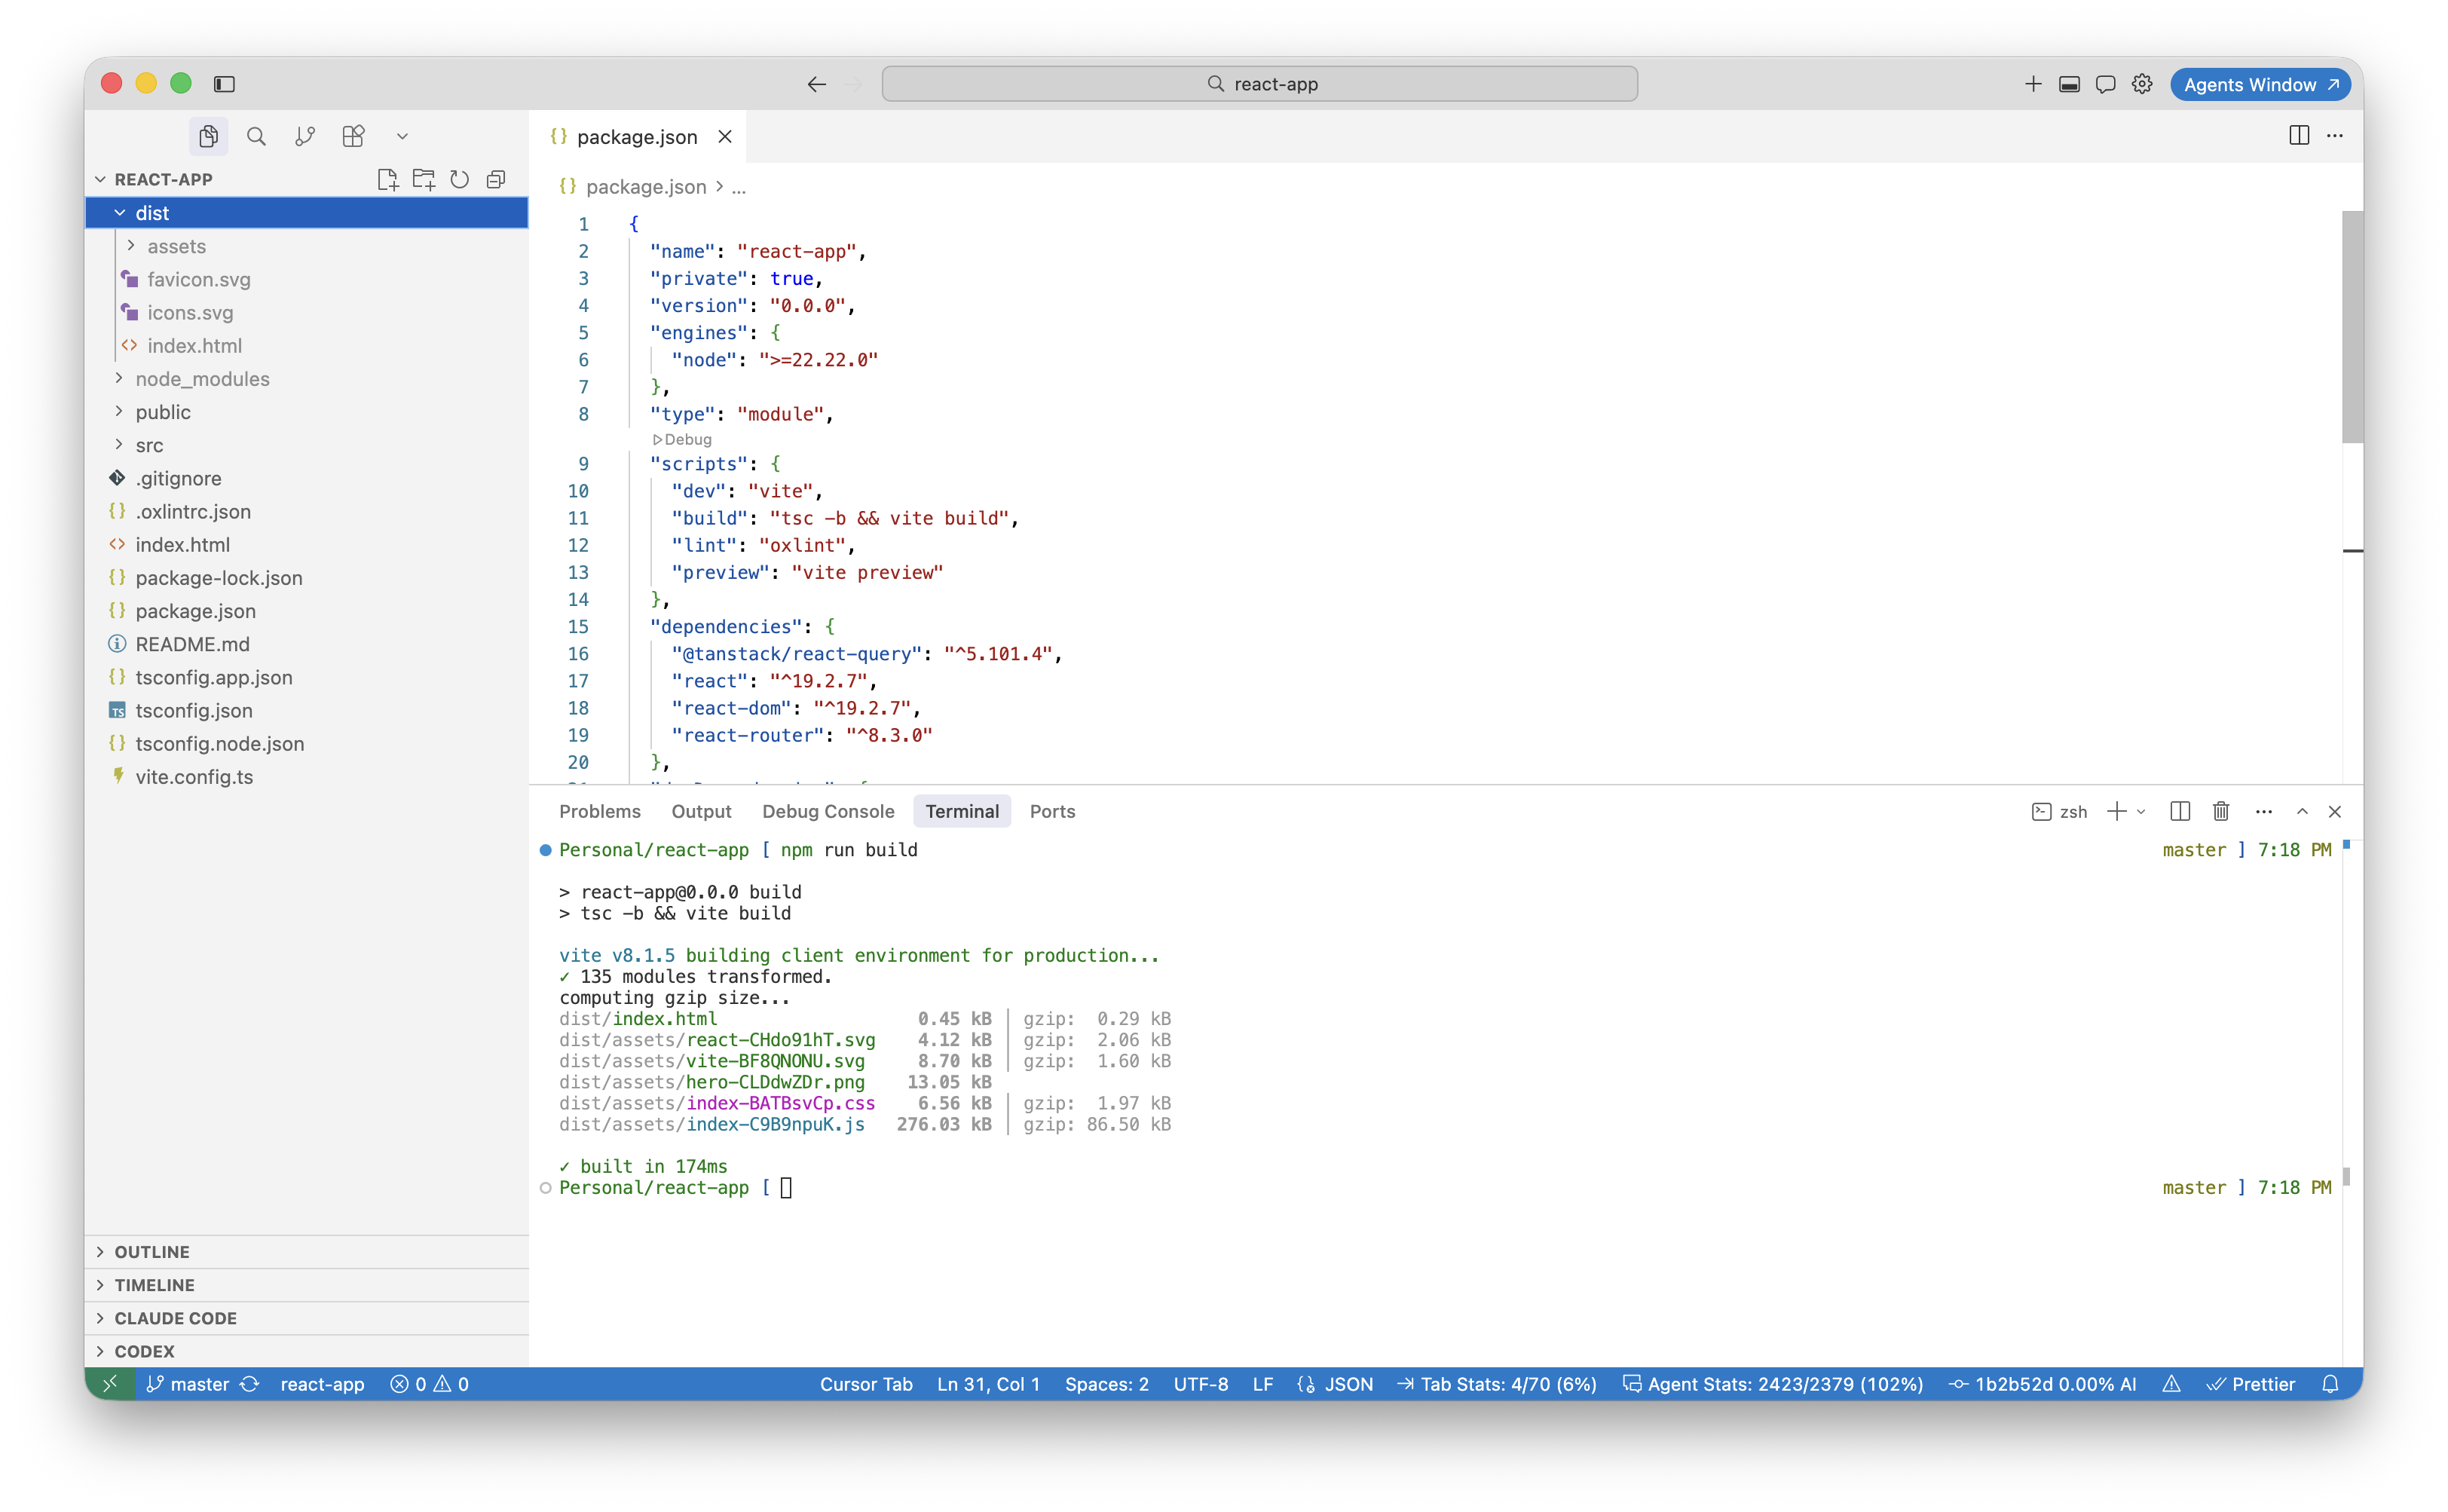
npm run build
Confirm that npm run build succeeds and produces an output folder. Vite defaults to dist, but you can use any folder name your bundler writes to. In App Platform, set that path as the build directory (for example /dist or /my-output). You can change it in Configuration at any time; save the new path and redeploy so Kubana serves the updated folder.
Step 1 — Creating the App on App Platform
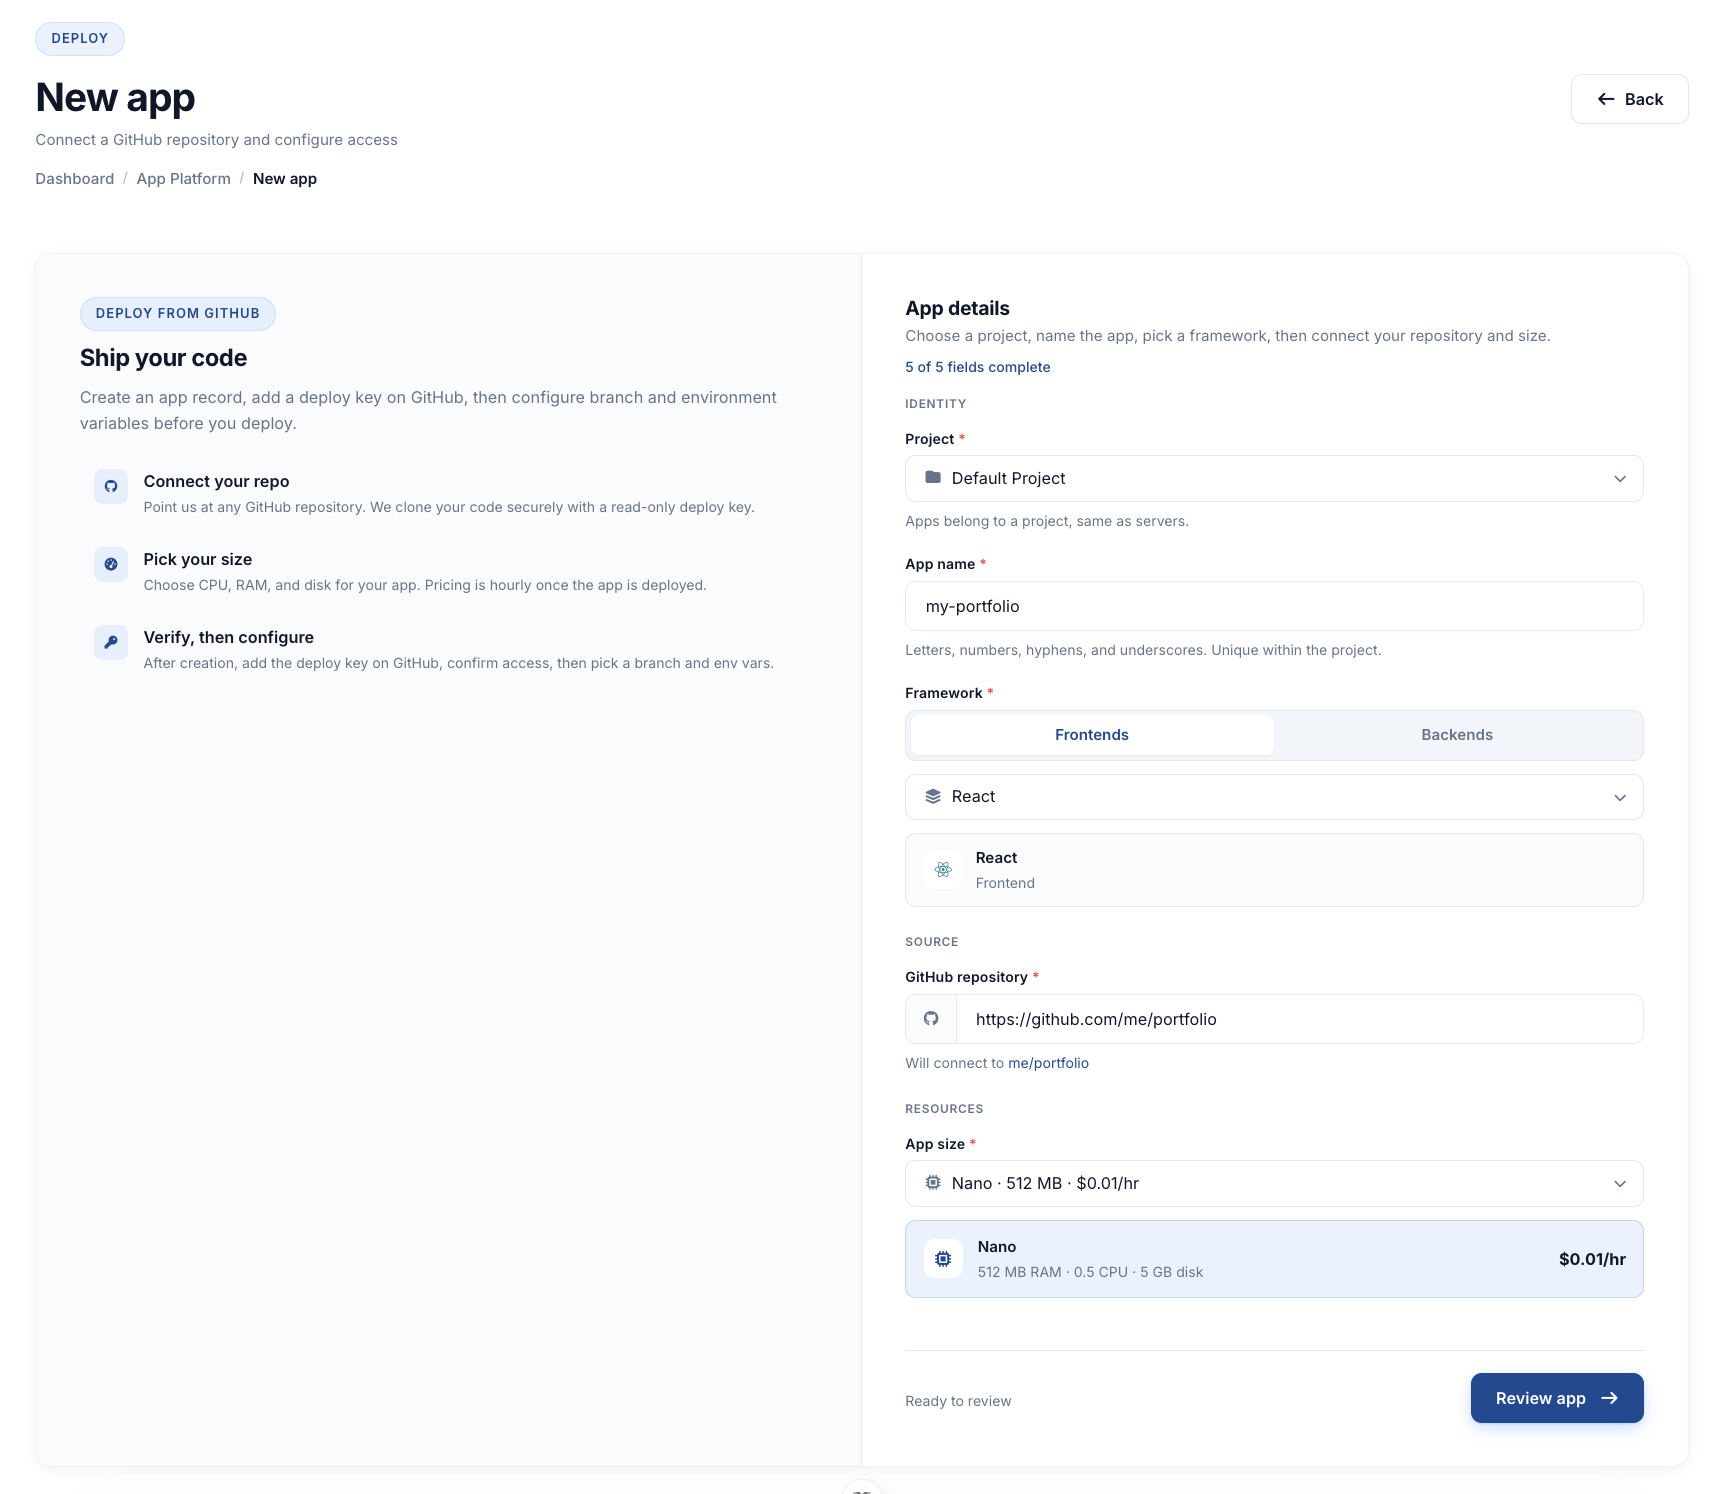
In the Kubana dashboard, open App Platform and choose Create app.
Fill in the form:
- Project — The project this app belongs to.
- Name — A label you will recognize later, for example
my-react-app. - Framework — Choose Frontend, then React.
- GitHub repository — Paste the repo as
owner/repo,https://github.com/owner/repo, orgit@github.com:owner/repo.git. - Size — CPU, RAM, and disk. Pricing is hourly after the app is deployed.
Review the summary, confirm, and create the app. Kubana stores the app record and generates a public SSH deploy key. It does not clone or build until you add that key and finish configuration.
Step 2 — Adding the Deploy Key on GitHub
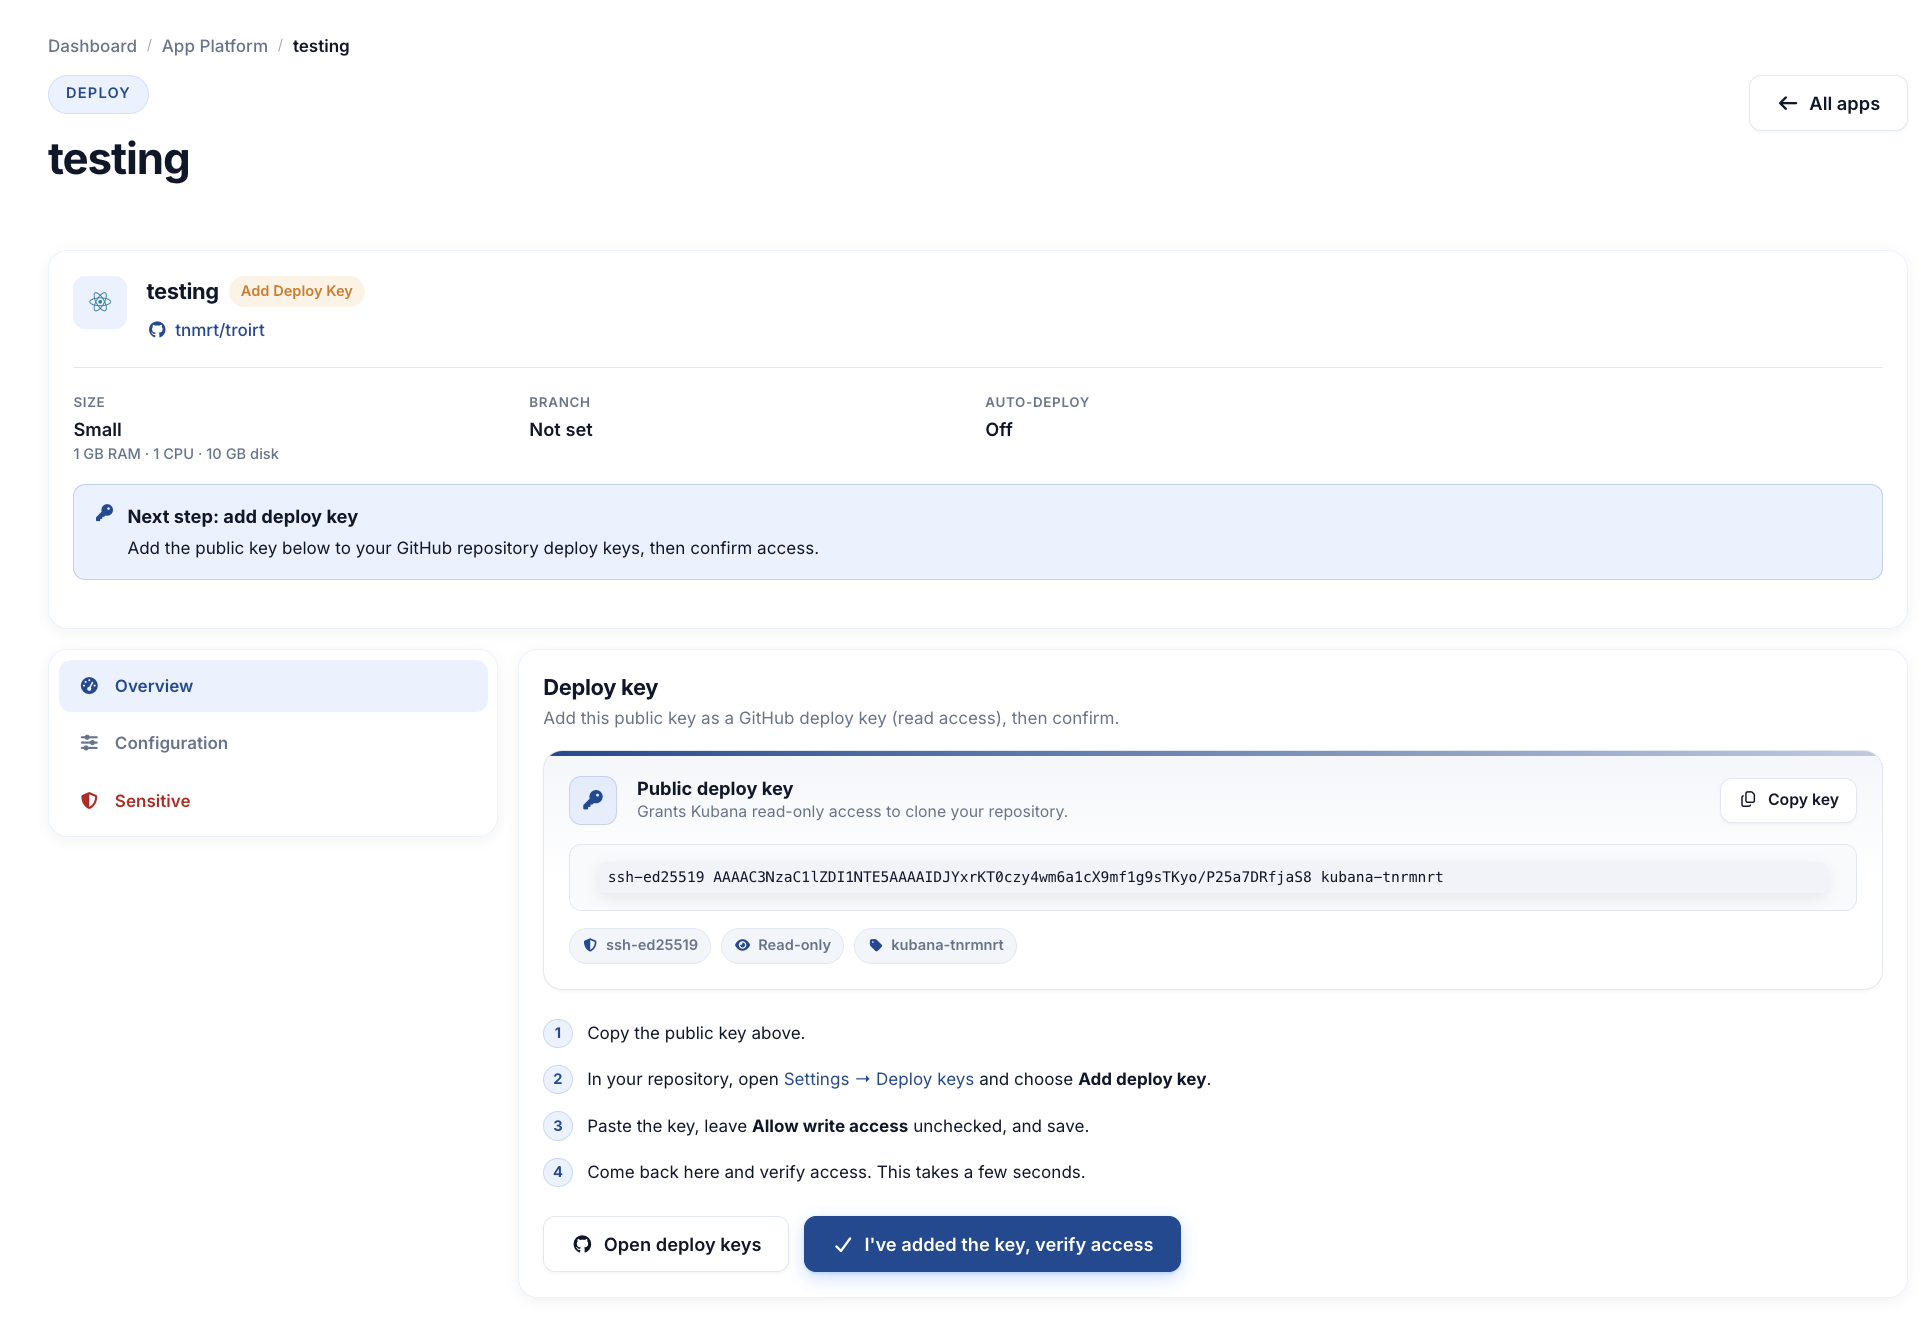
The new app opens on the Deploy key panel. The key grants Kubana read-only access so it can clone the repository. Leave write access off.
- Copy the public deploy key from the dashboard.
- In GitHub, open the repository → Settings → Deploy keys → Add deploy key. From the Kubana deploy key panel you can click Open deploy keys to jump straight to that page.
- Paste the key, give it a title such as
Kubana App Platform, and leave Allow write access unchecked. - Save, then return to Kubana and choose I've added the key, verify access.
Verification takes a few seconds. When it succeeds, the app status moves to Ready, and branch, build directory, environment variables, and domains unlock.
If verification fails, confirm the key is on the same repository you entered at creation, that it was saved, and that write access is not required (read-only is enough).
Step 3 — Choosing the Git Branch
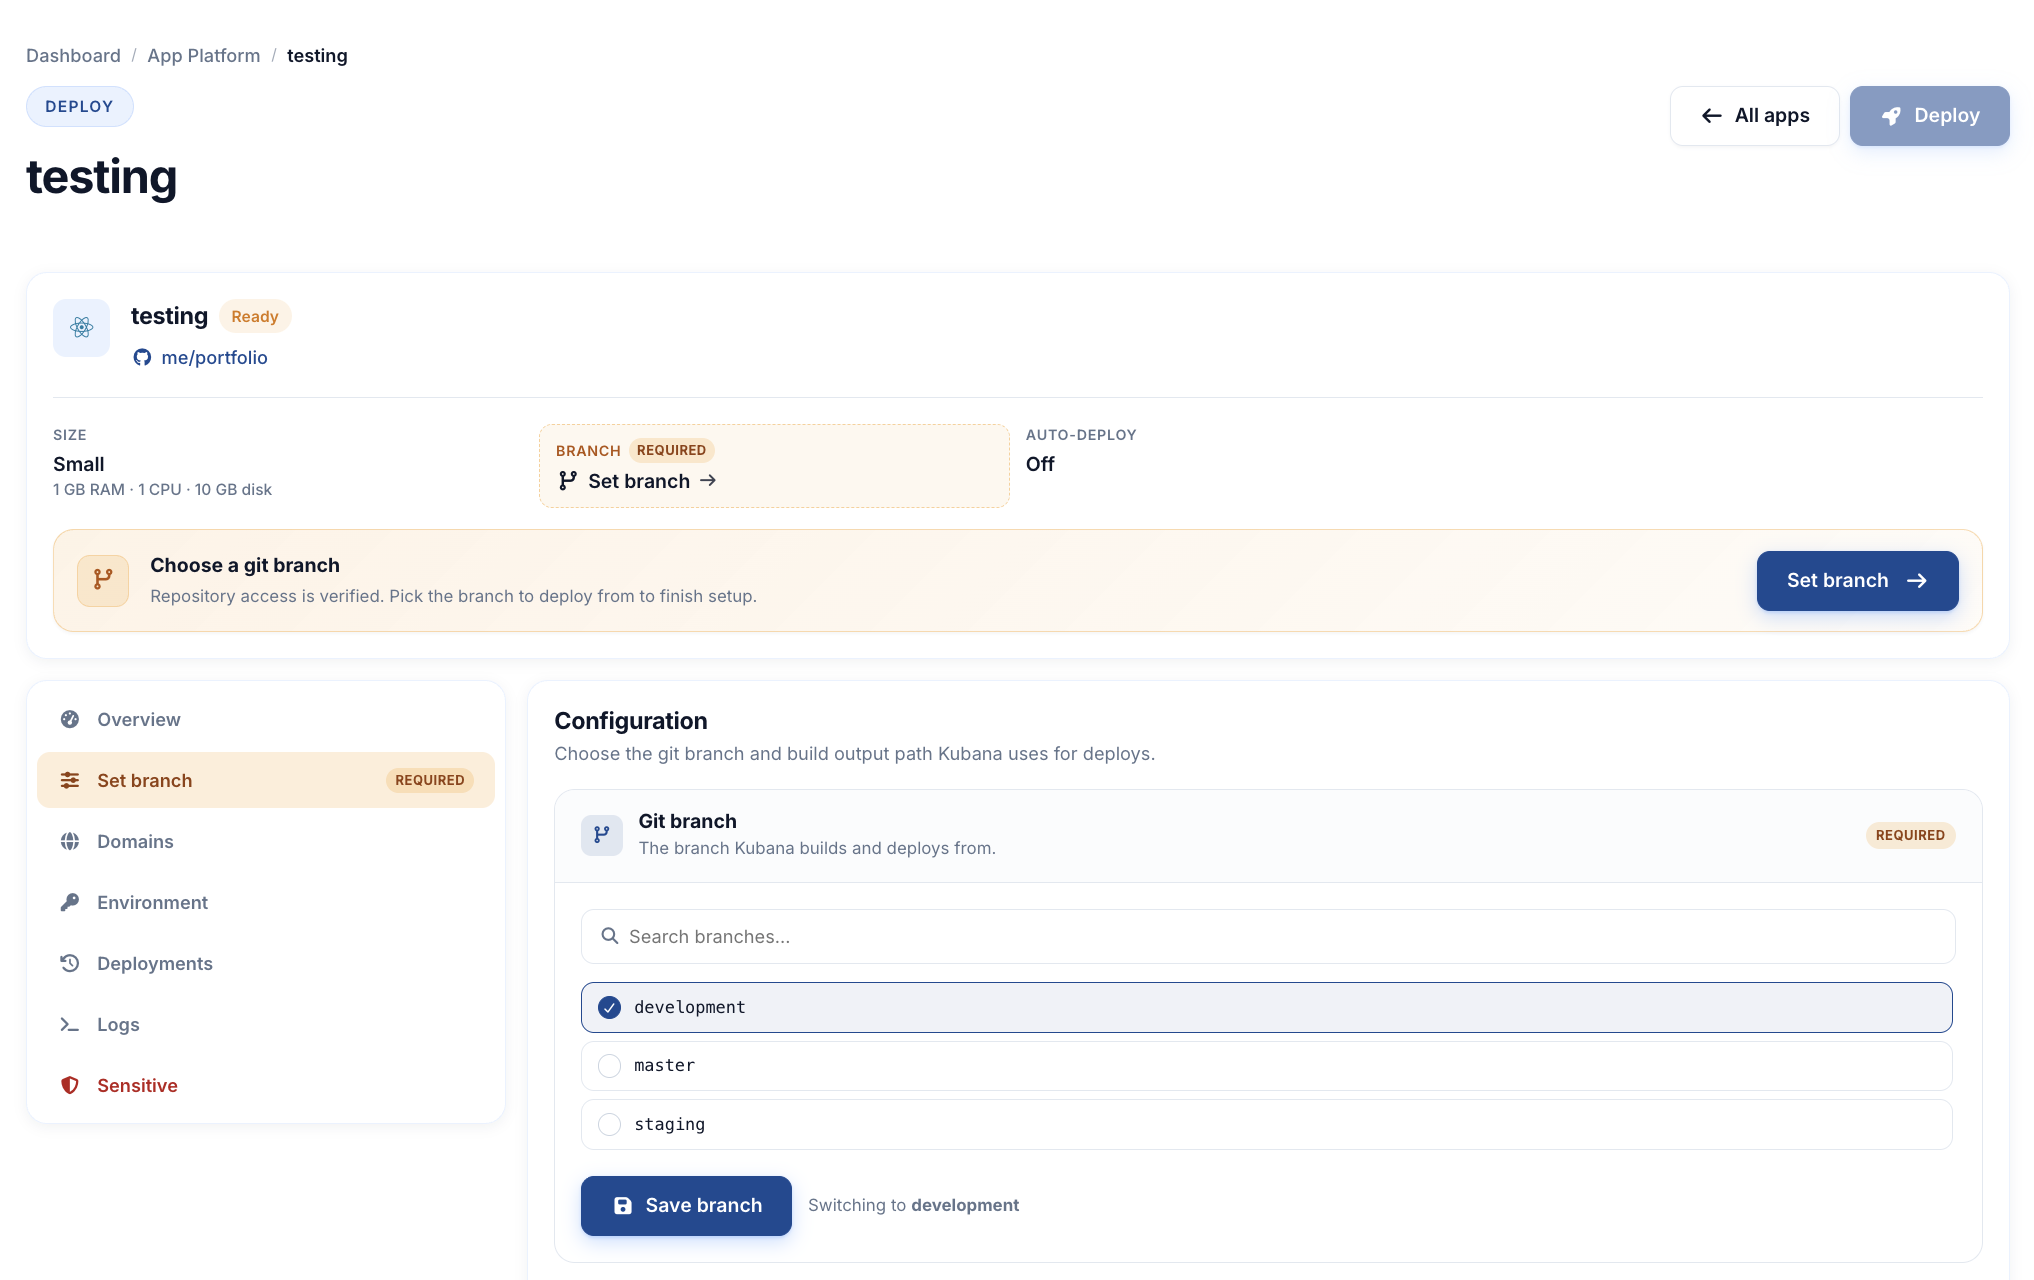
Open the Configuration tab. Load branches from GitHub, select the branch Kubana should build (usually main or master), and save.
Kubana deploys only this branch. Feature branches are ignored unless you switch the saved branch.
If you change the branch later, save it, then Redeploy so the running app matches the new branch. Saving the branch alone does not start a deploy.
Step 4 — Setting the Build Directory
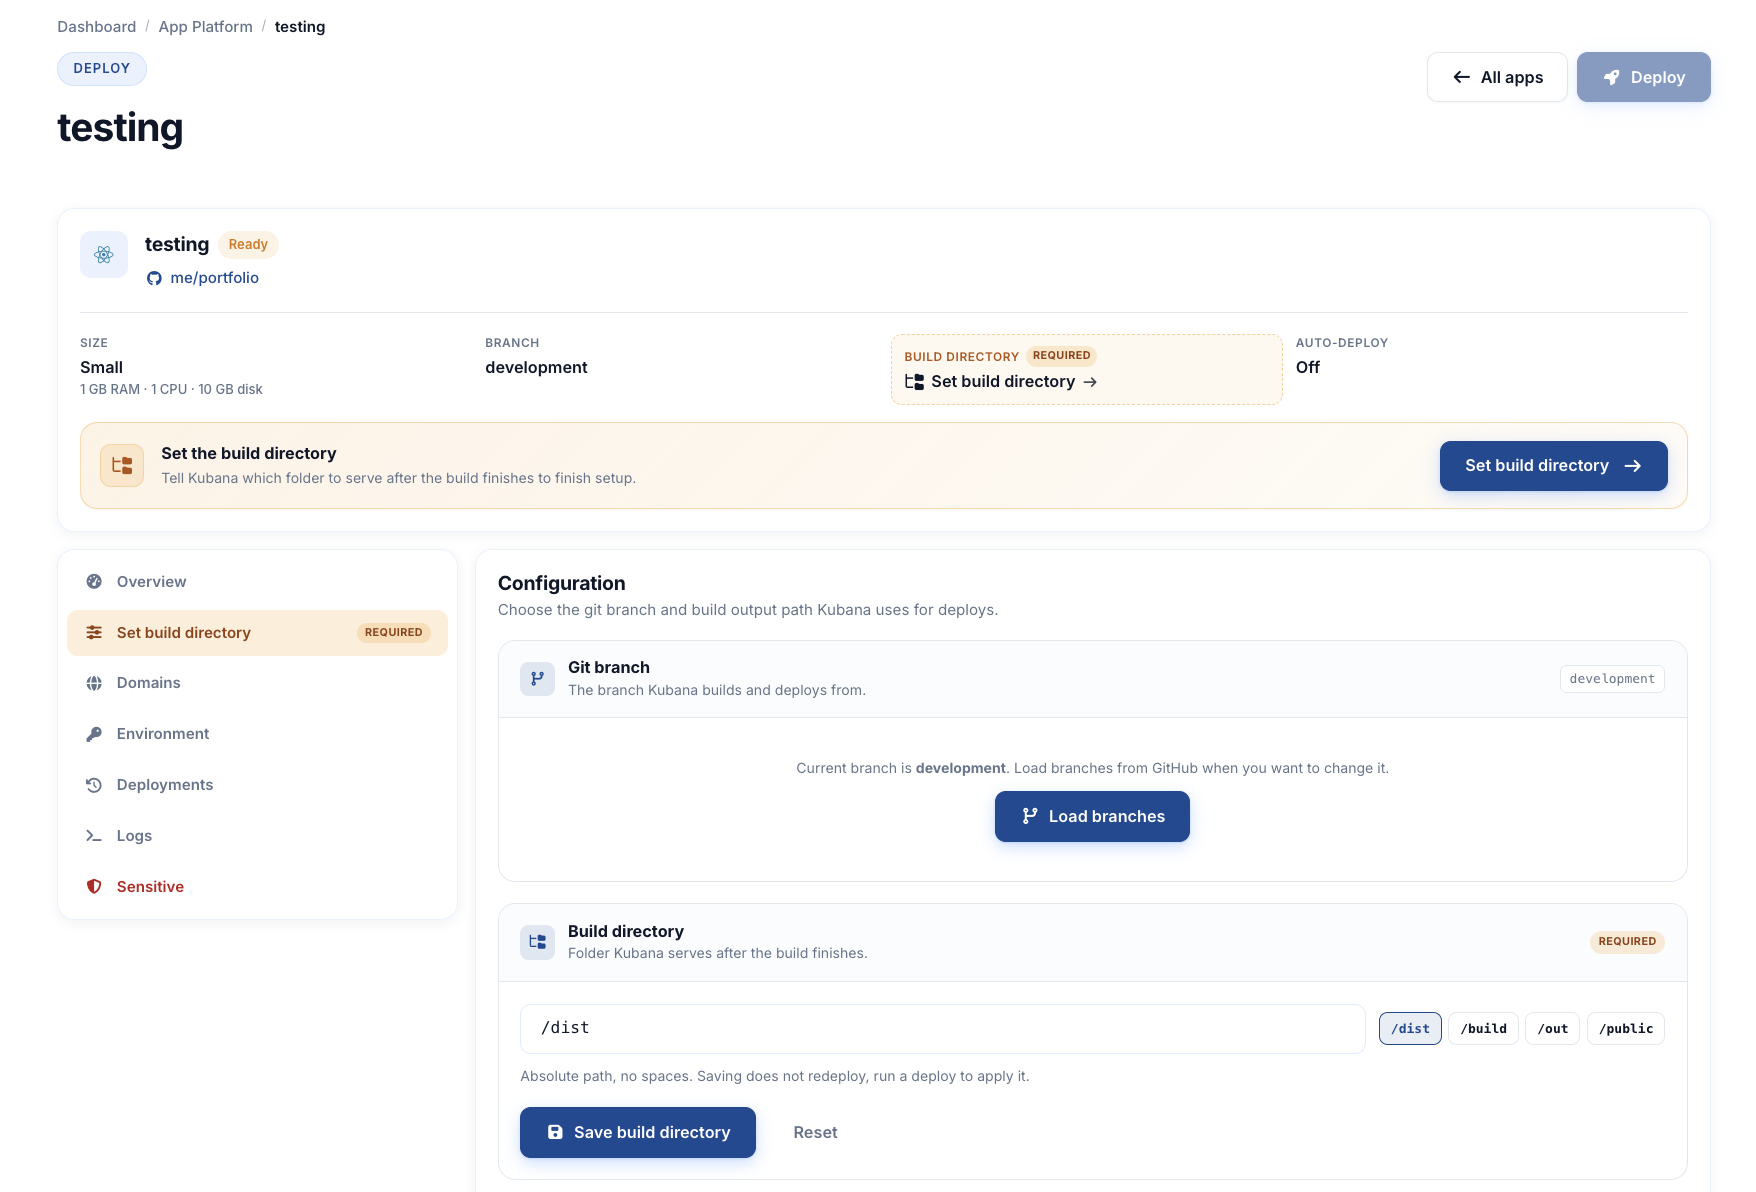
Frontend apps must declare the folder Kubana serves after the build. The path is absolute, has no spaces, and starts with /.
Typical values:
| Tooling | Build command | Build directory |
|---|---|---|
| Vite | npm run build |
/dist |
| Create React App | npm run build |
/build |
| Next.js static export | next export (or output: 'export') |
/out |
For a standard Vite React app, set Build directory to /dist and save.
The dashboard suggests /dist, /build, /out, and /public. Saving the path does not redeploy. Run a deploy (or wait for auto-deploy) for the new directory to take effect.
Note: App Platform expects a static frontend build. A full Next.js or Remix server is a different runtime. If your React app is a Node server rather than a static
index.htmlbundle, this React frontend flow is not the right fit.
Step 5 — Adding Environment Variables (Optional)
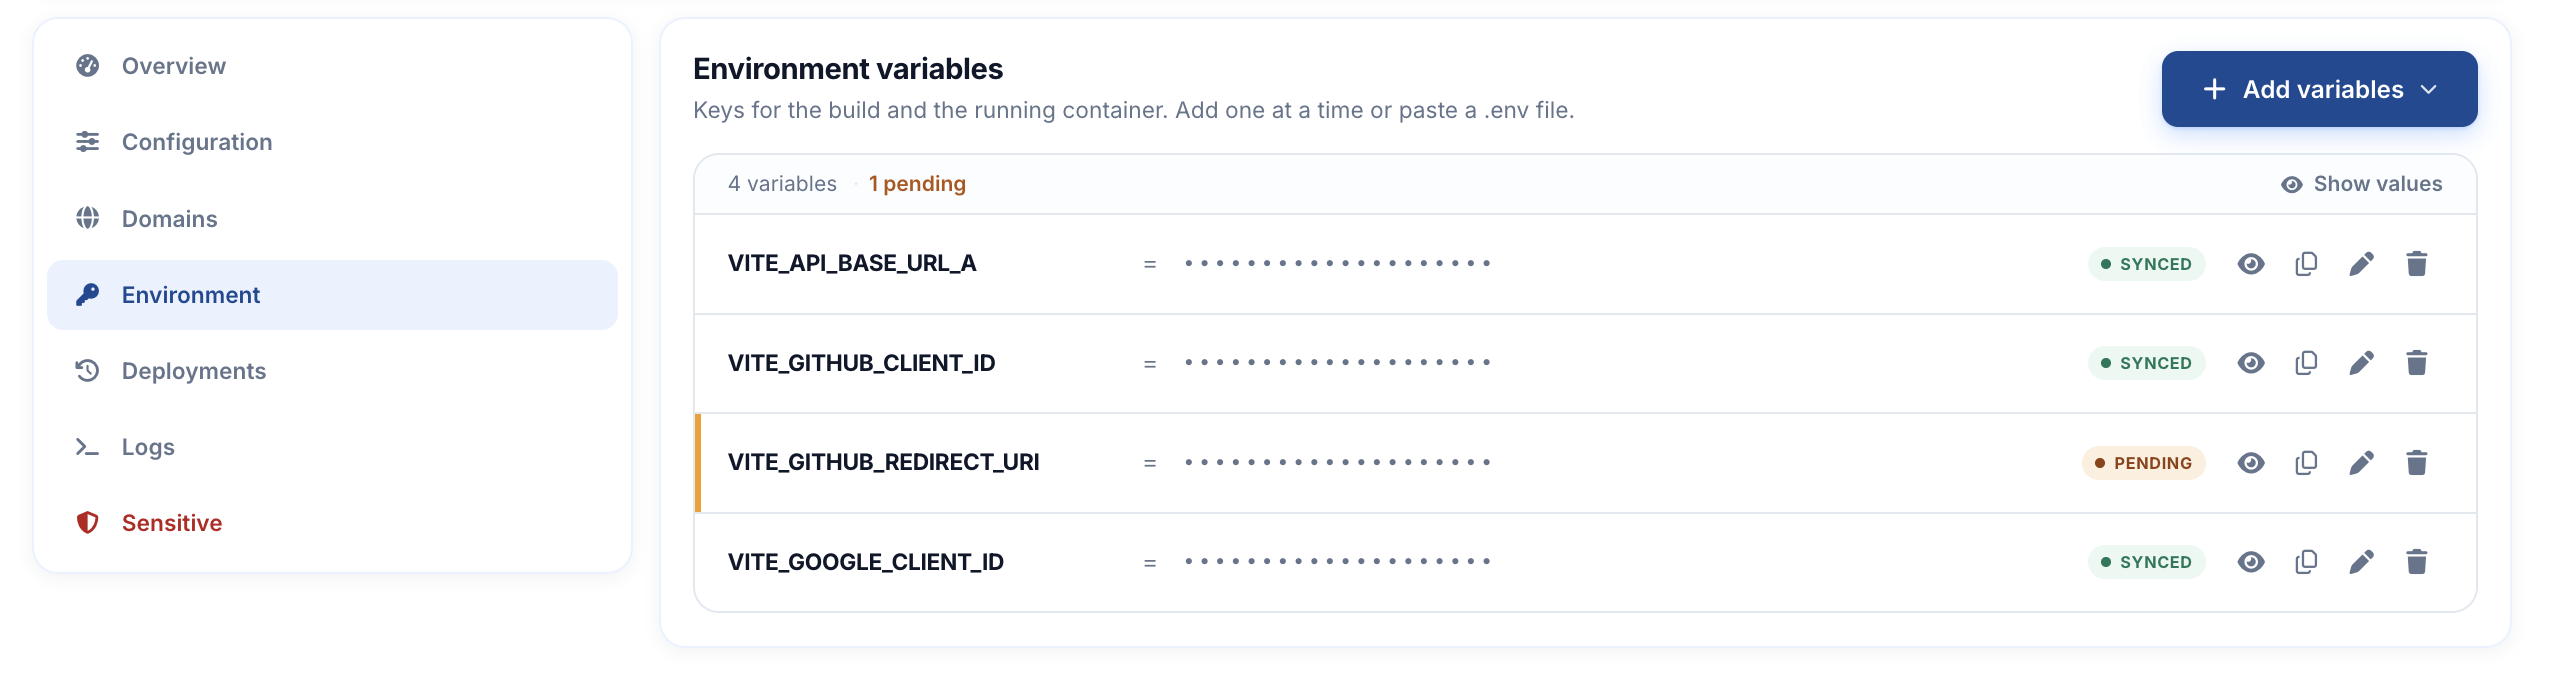
Open the Environment tab. You can add a single KEY=value or paste a .env file. Keys are stored in Kubana and sync to the build and runtime on the next deploy. New or edited keys show as Pending until that deploy succeeds.
React only exposes variables that follow your bundler's prefix:
Vite:
VITE_API_URL=https://api.example.com
VITE_APP_NAME=My React App
Read them in the app with import.meta.env.VITE_API_URL.
Create React App:
REACT_APP_API_URL=https://api.example.comRead them with process.env.REACT_APP_API_URL.
Variables without the prefix are available to the build environment but are not inlined into browser JavaScript. Never put secrets in VITE_* or REACT_APP_* keys — they ship to the client.
After you add or change variables, deploy again so they reach the running app.
Step 6 — Deploying the App
When the deploy key is confirmed, a branch is saved, and the build directory is set, Deploy becomes available.
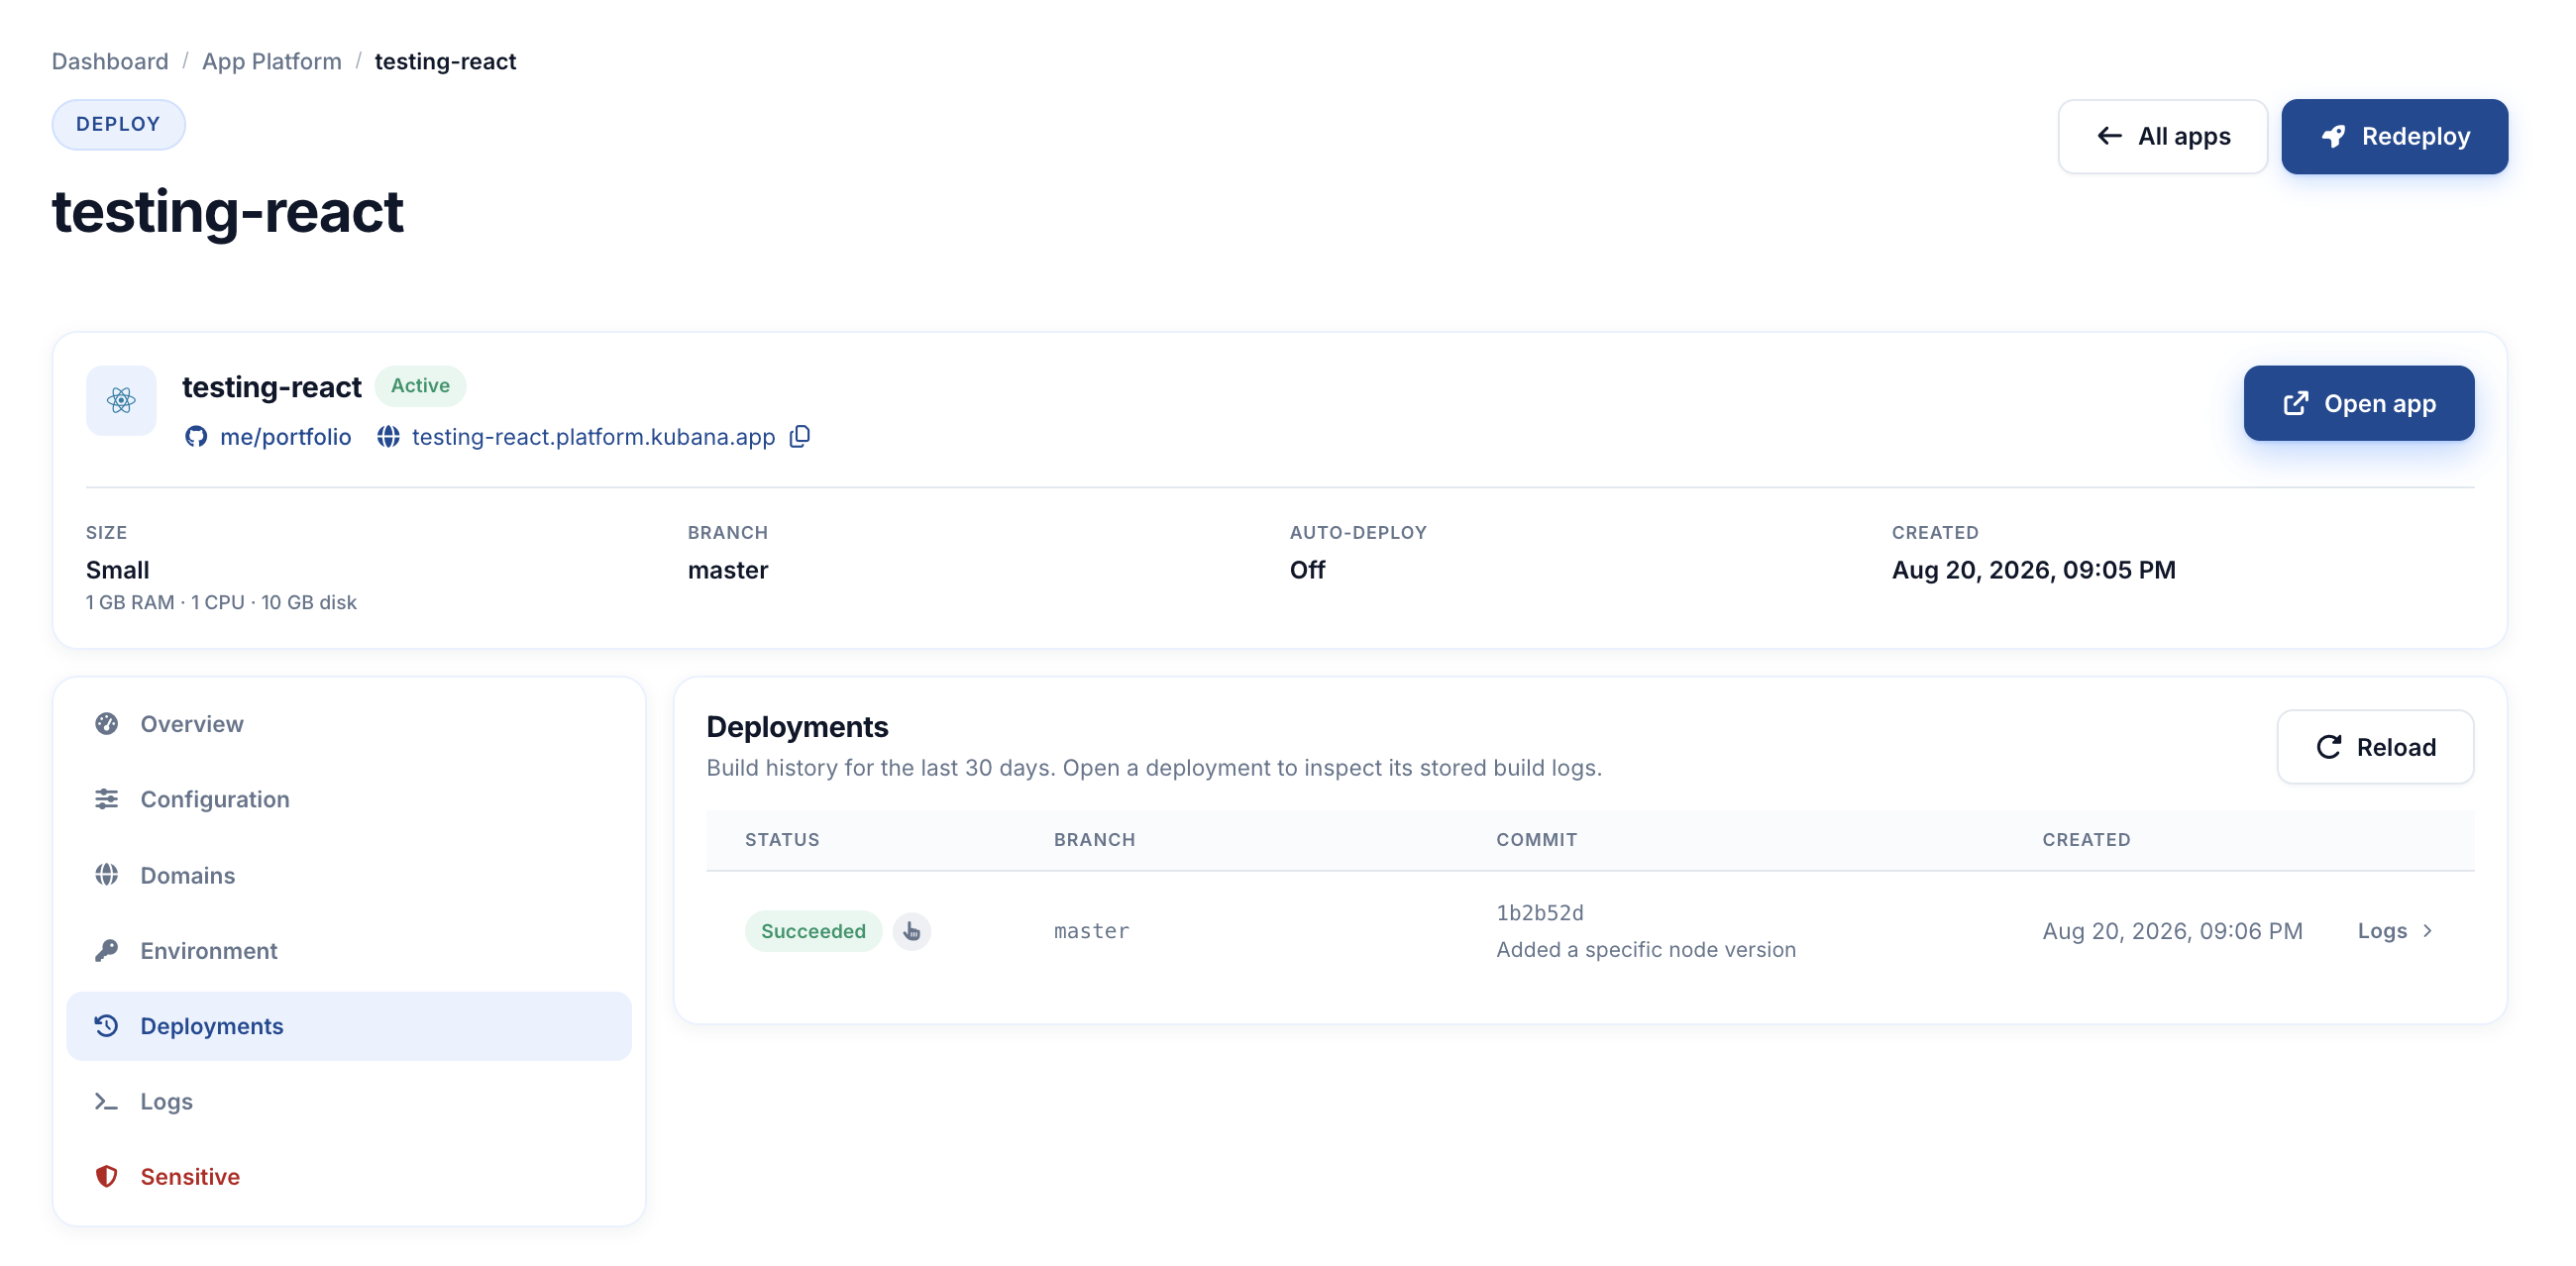
Choose Deploy and confirm. Status moves through Deploying while Kubana clones the branch, installs dependencies, runs the build, and publishes the build directory. You can follow progress in Deployments (commit, branch, queued / in progress / succeeded / failed) and open build logs if a deploy fails.
When the app is Active, the overview shows a public URL. Open it over HTTPS to confirm the React UI loads.
Note: On a new app, SSL can take a few minutes to finish issuing — both for the generated
*.platform.kubana.apphostname and for any custom domain you attach. If the browser warns that the certificate is not ready, wait and try again.
If the deploy fails:
- Confirm
npm run build(or your package manager's build script) works on the selected branch. - Confirm the build directory matches the folder your bundler actually writes (
/distvs/build). - Check that required
VITE_*/REACT_APP_*variables are present. - Read the failed deployment's logs in the dashboard.
A failed or stopped app can be deployed again with Redeploy. Changing the branch, build directory, or environment variables also requires a redeploy to apply.
Step 7 — Enabling Auto-Deploy (Optional)
Auto-deploy rebuilds the app when GitHub receives a push to the saved branch. Enable it only after the deploy key, branch, and build directory are set.
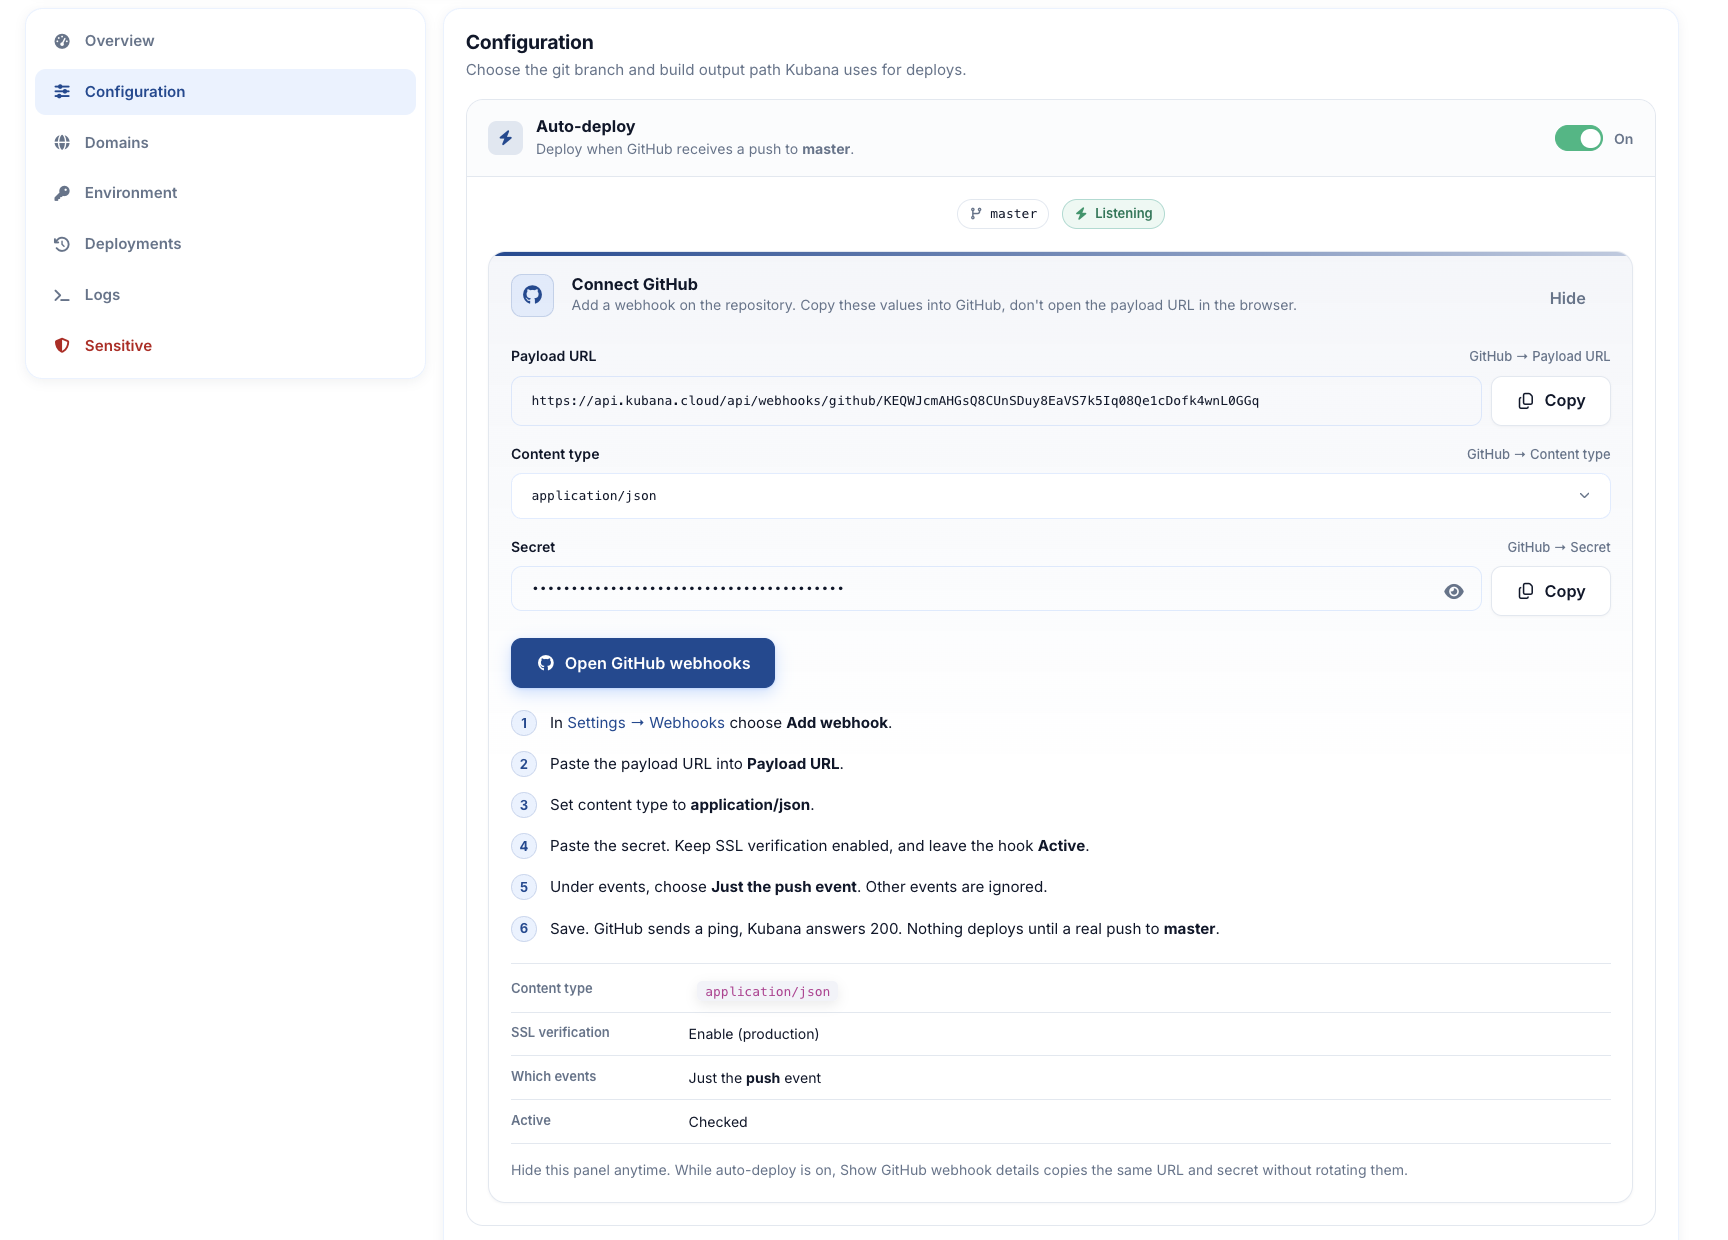
- On Configuration, turn Auto-deploy on and confirm.
- Choose Show GitHub webhook details and copy the Payload URL and Secret. Do not open the payload URL in a browser.
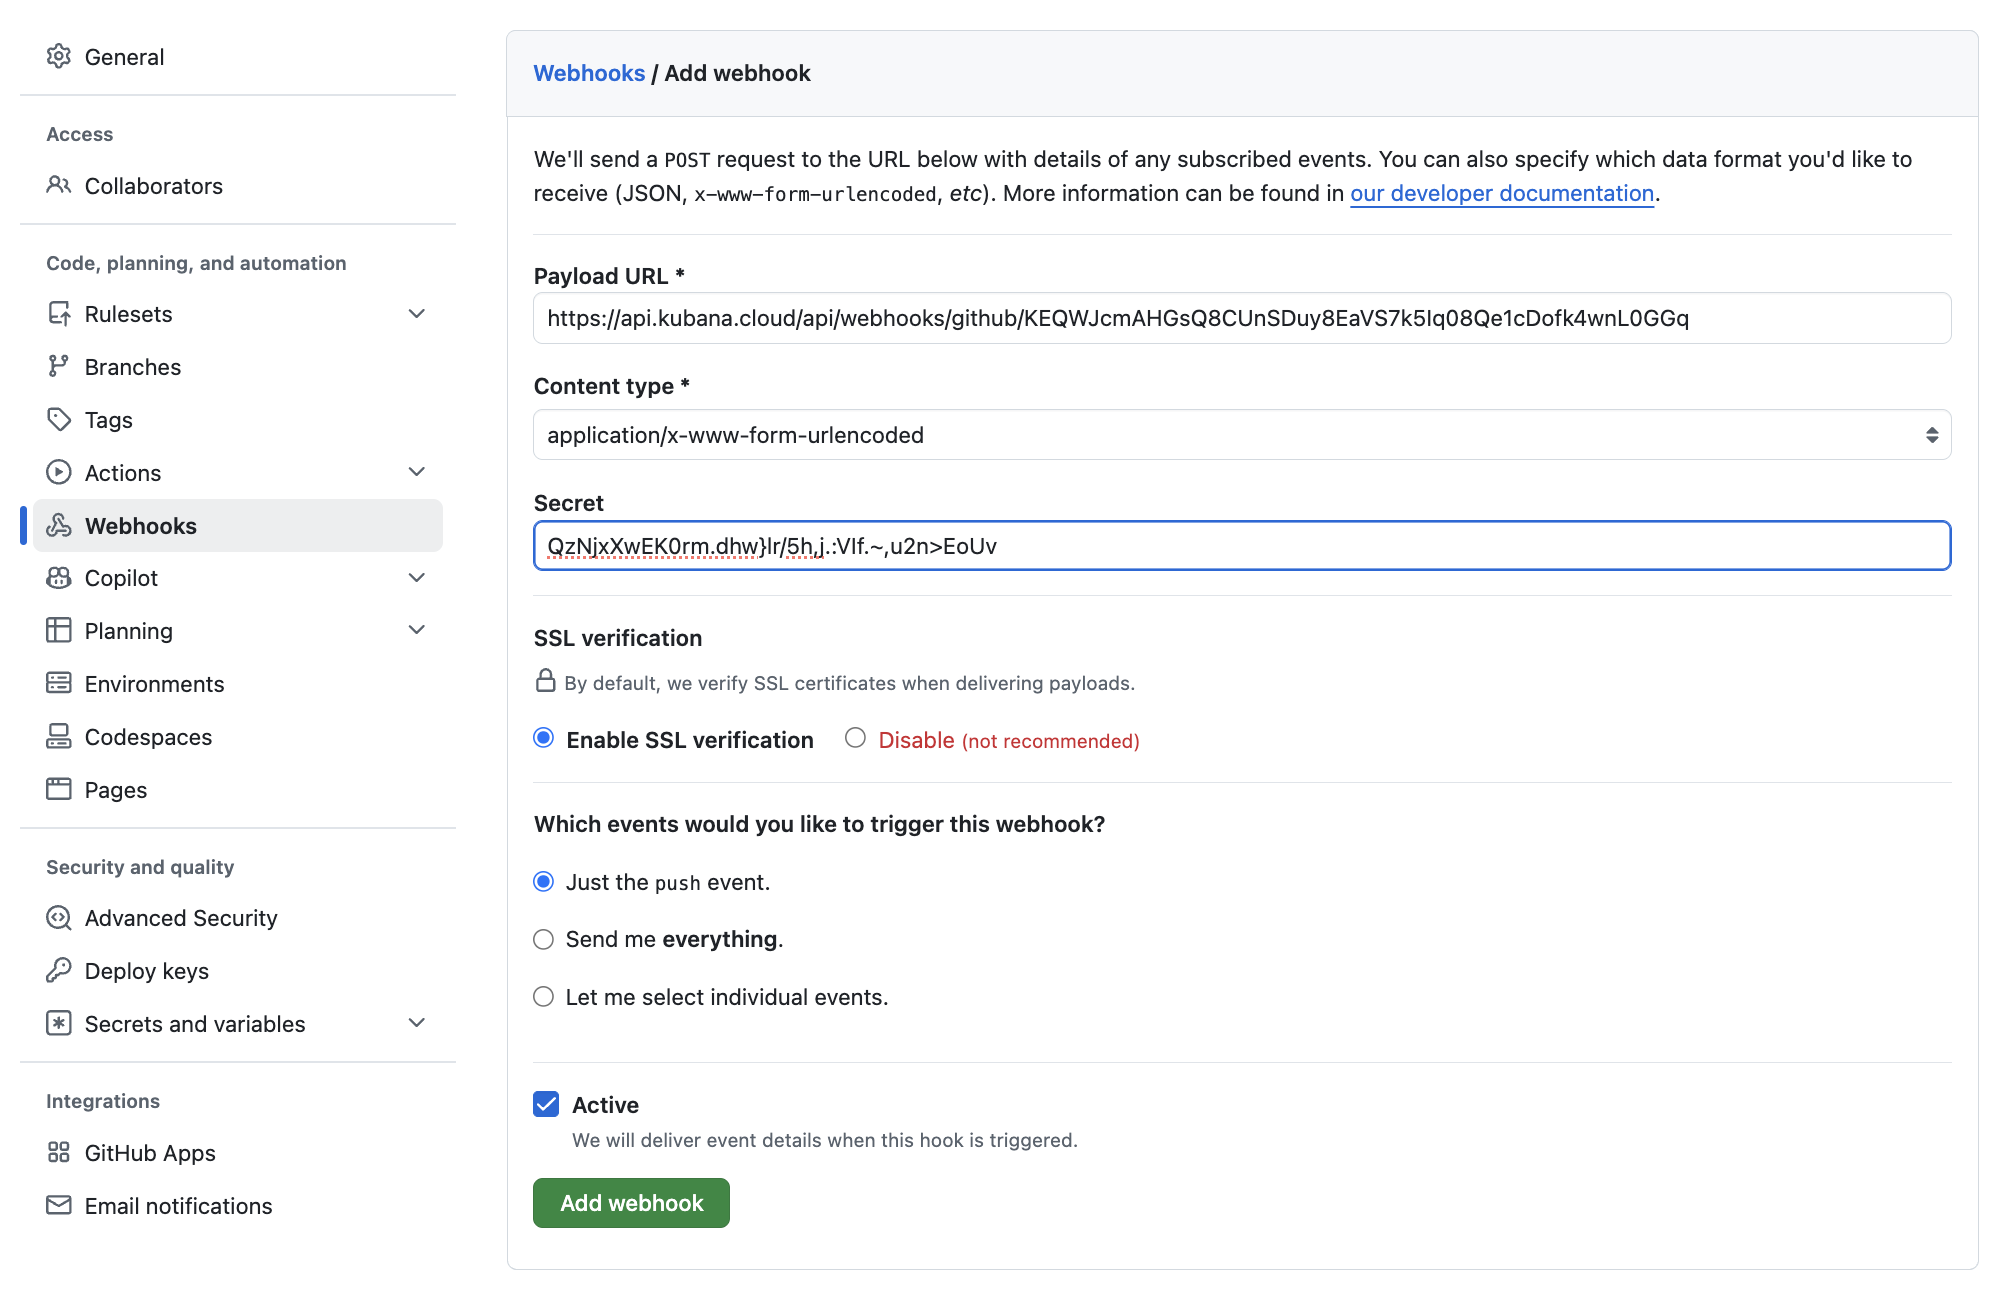
- In GitHub, open the repository → Settings → Webhooks → Add webhook.
- Paste the payload URL, set content type to
application/json, paste the secret, keep SSL verification on, and leave the hook Active. - Under events, choose Just the push event. Other events are ignored.
- Save. GitHub sends a ping; Kubana answers
200. Nothing deploys until a real push to the saved branch.
After that, git push to the configured branch starts a new deployment. The deployment list labels these as Auto deploy. You can turn auto-deploy off at any time; the webhook on GitHub can be removed if you no longer need it.
Enable auto-deploy
Add github webhook
Step 8 — Attaching a Custom Domain (Optional)
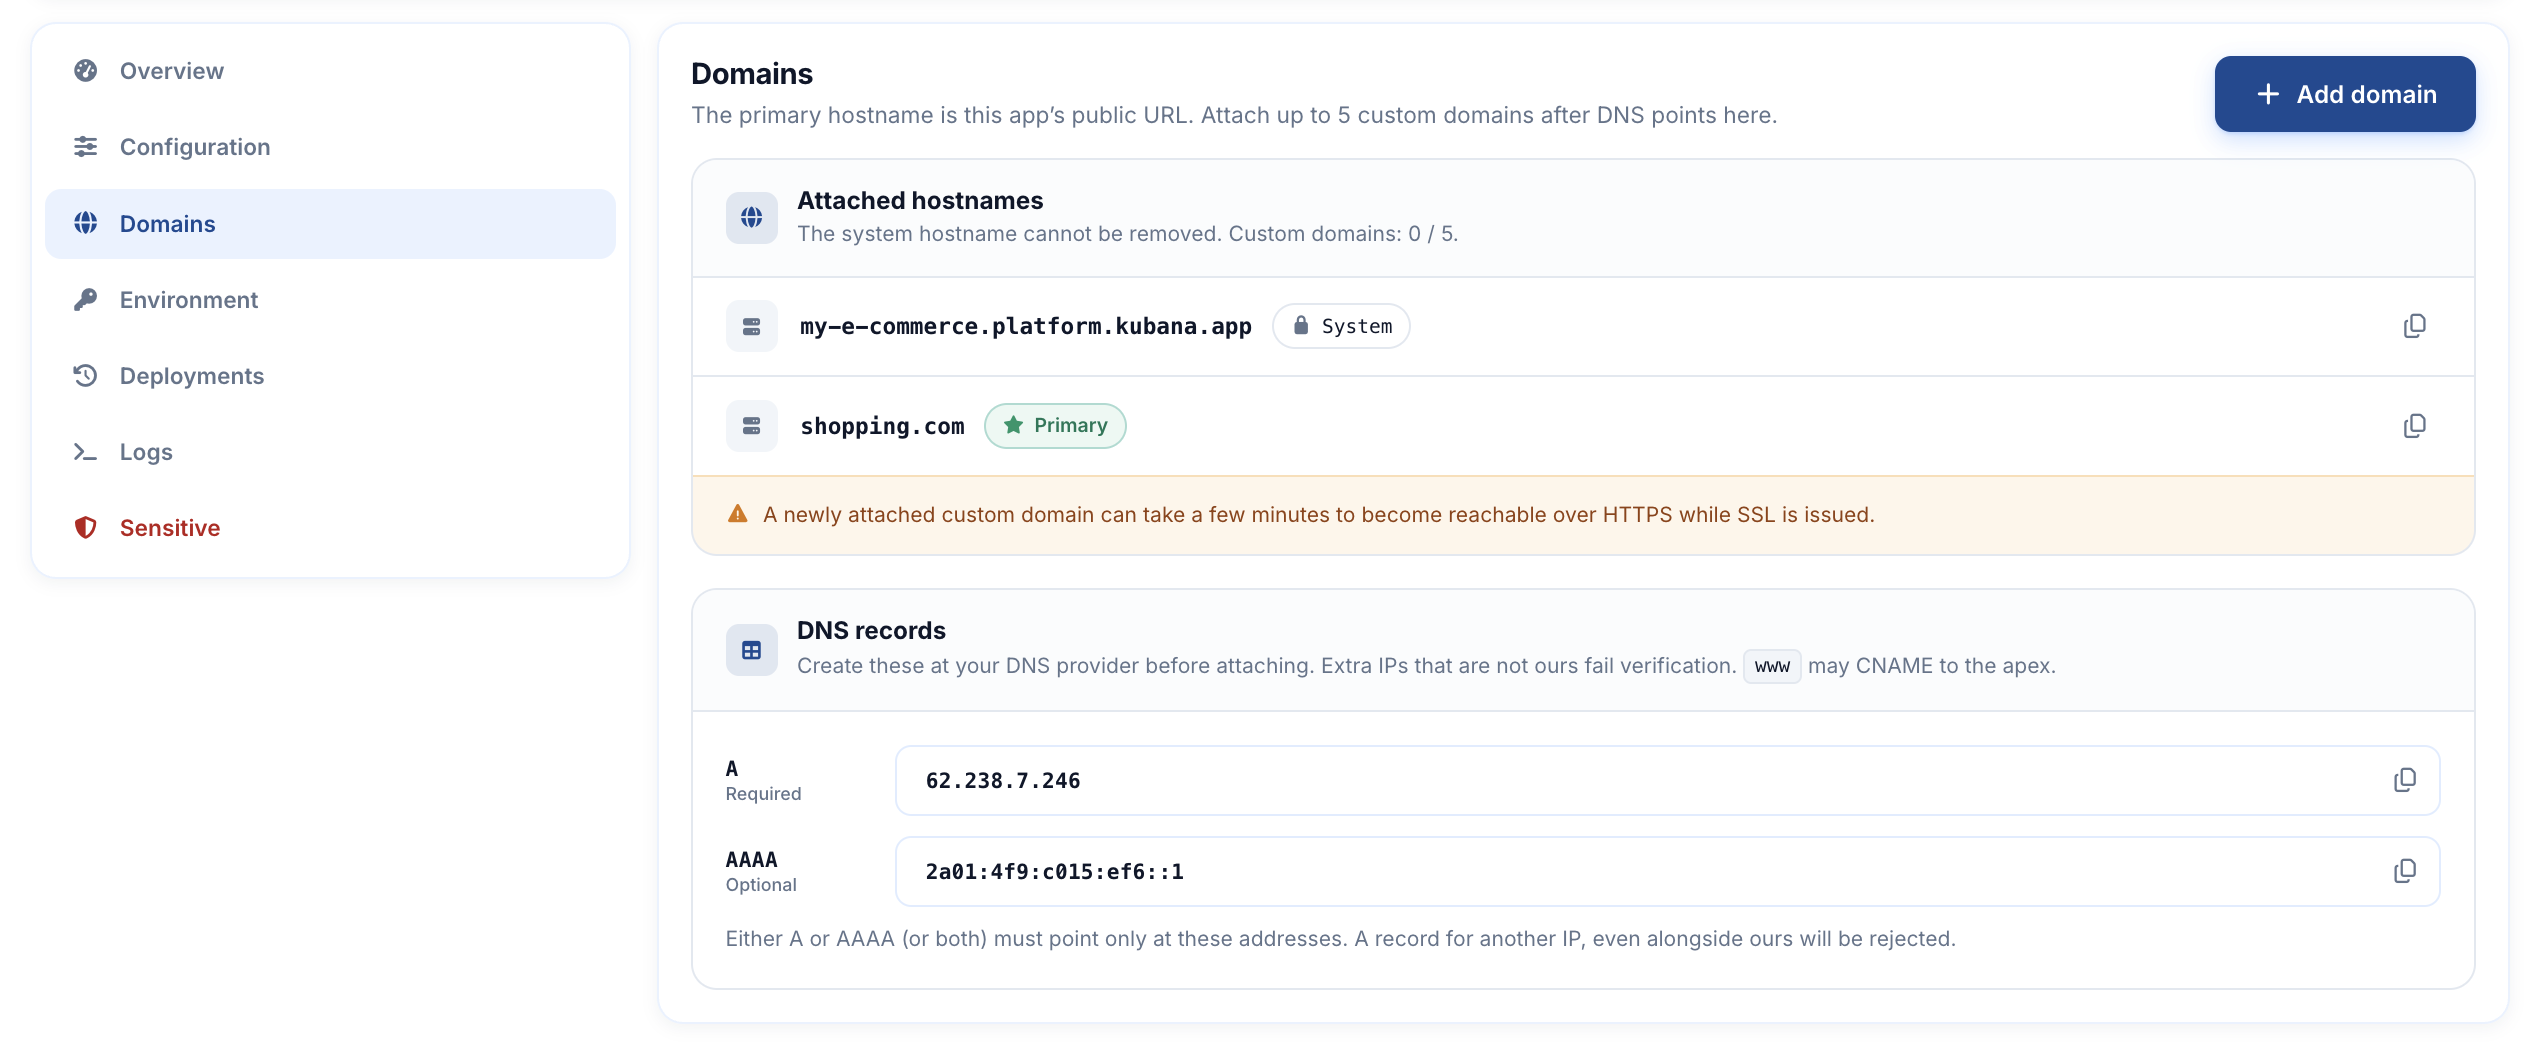
Every HTTP app gets a default Kubana hostname. You can attach up to five custom domains. TLS is issued for you after DNS verifies.
Create DNS records before you attach the hostname. Extra A/AAAA records that do not point at Kubana fail verification. www may CNAME to the apex.
| Type | Host | Value | Required |
|---|---|---|---|
| A | @ (or your subdomain) |
62.238.7.246 |
Yes |
| AAAA | @ (or your subdomain) |
2a01:4f9:c015:ef6::1 |
Optional (IPv6) |
Then, in the app Domains tab:
- Enter the hostname (for example
app.example.comorexample.com). - Attach the domain. Kubana verifies DNS.
- Optionally set it as primary so it is the main public URL.
A newly attached domain can take a few minutes to become reachable over HTTPS while the certificate is issued.
If the domain lives on Kubana DNS, add the records in DNS Management. If it lives elsewhere, add them at that provider.
Step 9 — Managing the App After Deploy
Use the app page for day-to-day operations:
- Overview — Status, repository, branch, build directory, auto-deploy, public URL.
- Deployments — History, commit, trigger (manual or auto), build logs.
- Logs — Output from the running container.
- Environment — Add, edit, or delete keys. Changes apply on the next deploy.
- Configuration — Switch branch, change build directory, toggle auto-deploy.
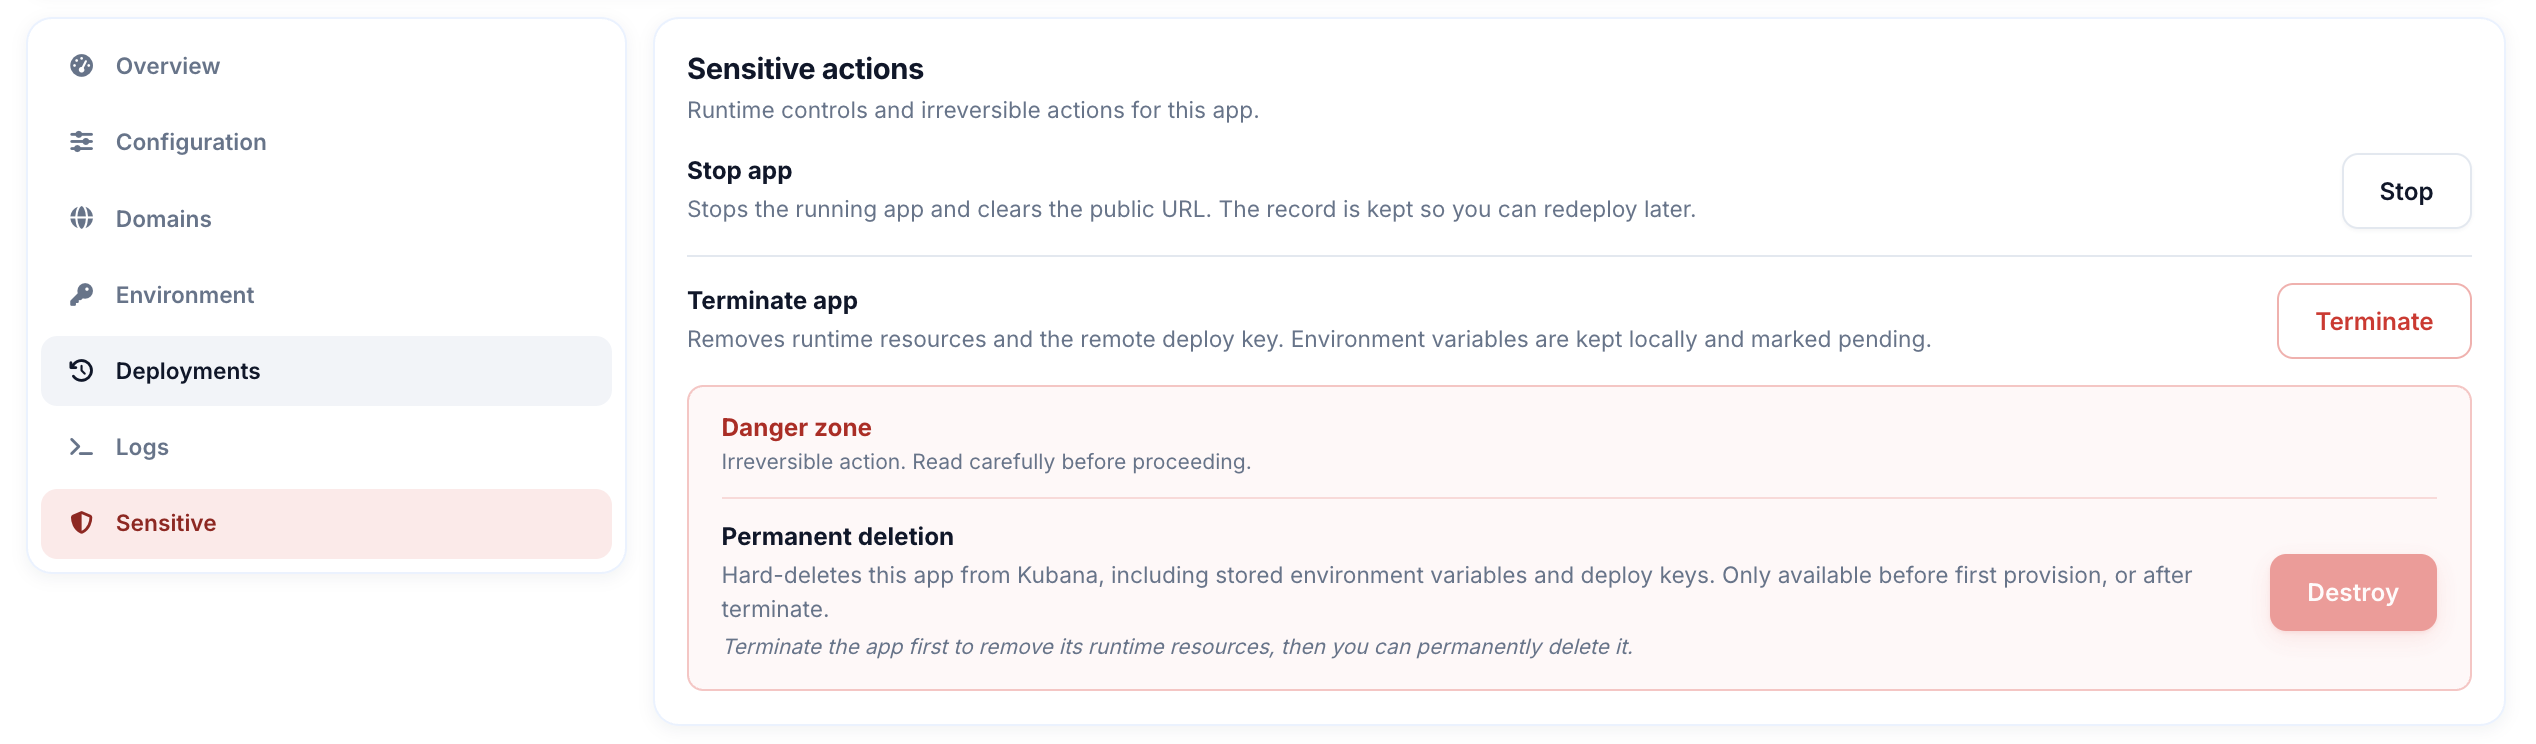
Sensitive actions:
| Action | What it does |
|---|---|
| Stop | Stops the running app and clears the public URL. The Kubana record stays so you can redeploy. |
| Redeploy | Builds again from the saved branch (from Active, Stopped, Error, or after terminate). |
| Terminate | Removes runtime resources and the remote deploy key. Environment variables on the Kubana record are kept. |
| Delete | Permanently removes the app from Kubana, including stored environment variables. Available before the first provision, or after terminate. Type the app name to confirm. |
Hourly billing applies while the app is deployed and stopped. Terminate or delete when you no longer need the runtime to stop billing.
Conclusion
You now have a React application on Kubana App Platform: the GitHub repo is connected with a read-only deploy key, a branch and build directory are set, and the app is reachable over HTTPS. From here you can add environment variables, turn on auto-deploy so every push rebuilds, and point a custom domain at the app.
A typical Vite setup looks like this locally and in the dashboard:
# Local check before you push
npm run build
# Output folder → App Platform build directory: /dist
# Dashboard → Environment (then redeploy)
VITE_API_URL=https://api.example.comFor more on App Platform, see the product overview in the dashboard, or contact support if a deploy fails after the logs look correct.